It appears that Firefox doesn’t understand the ISO-8859-15 charset when it’s related to a “plain/text”. So you need to change the charset to ISO-8859-1 to make sure that Firefox will show the special characters for your document.
Show/Hide a Sharepoint fields in the NewForm, EditForm and DispForm
With the Sharepoint WebServices it’s possible to hide a field into the NewForm, the Editform and/or the DispForm.
You’ll need to use JavaScript with jQuery and SPServices. It’s the UpdateList service that will do the trick.
Once you have loaded the both librairies you can use the below code:
var fieldsToUpdate = '<Fields>';
fieldsToUpdate += '<Method ID="1"><Field Type="Text" Name="My_x0020_Field" DisplayName="My Field" ShowInDisplayForm="FALSE" ShowInEditForm="FALSE" ShowInNewForm="FALSE"></Field></Method>';
fieldsToUpdate += '</Fields>';

$().SPServices({
  operation: "UpdateList",
  listName: "Name of the list",
  listProperties:"",
  updateFields: fieldsToUpdate,
  newFields: "",
  deleteFields: "",
  listVersion: "",
  completefunc: function (xData, Status){}
});
As explained into this Stackoverflow’s question you must provide a minimum of three mandatory properties, and in this order:
- Type
- Name
- DisplayName
The Type must reflect the type of your field. This information is available into the MSDN documentation. The most common values should be Boolean | Calculated | Choice | Currency | DateTime | Integer | Lookup | LookupMulti | MultiChoice | Number | Text | User | UserMulti.
The Name is the internal name (usually the spaces are replaced with “_x0020_”).
And for each form (ShowInDisplayForm | ShowInEditForm | ShowInNewForm) you can set them to TRUE or FALSE (it seems to be case sensitive ?!). More properties are available into the MSDN documentation.
Delete a User Custom Action from Sharepoint [JavaScript]
The MSDN documentation is a nightmare…. For example Microsoft provides an example to create a User Custom Action for Sharepoint, however there is no code about how to delete it.
So here is the code to use to delete the usercustomaction just created with the above example:
var siteUrl = '/site collection/site/';

function deleteUserCustomAction() {
    this.clientContext = new SP.ClientContext(siteUrl);
    var oWebsite = clientContext.get_web();
    this.collUserCustomAction = oWebsite.get_userCustomActions();
    clientContext.load(oWebsite,'UserCustomActions','Title');
    clientContext.executeQueryAsync(Function.createDelegate(this, this.deleteCustomAction), Function.createDelegate(this, this.onQueryFailed));
}
function deleteCustomAction() {
    var customActionEnumerator = collUserCustomAction.getEnumerator();
    while (customActionEnumerator.moveNext())  {
      var oUserCustomAction = customActionEnumerator.get_current();
      if (oUserCustomAction.get_title() == 'New Menu Item') {
           oUserCustomAction.deleteObject();
           clientContext.load(oUserCustomAction);
           clientContext.executeQueryAsync(Function.createDelegate(this, this.onQuerySucceeded), Function.createDelegate(this, this.onQueryFailed));
        }
    }
}
function onQuerySucceeded() {
    alert('Custom action removed');
}
function onQueryFailed(sender, args) {
    alert('Request failed. ' + args.get_message() + '\n' + args.get_stackTrace());
}
deleteUserCustomAction()
Dynamically inject a CSS code into the page [JavaScript]
Mozilla created a function that permits to inject some CSS into the document: addStylesheetRules()
But if you use jQuery you may want to use this function:
function injectCSS(rule) {
  $("head").append('<style>' + rule + '</style>')
}

// example
injectCSS("div { padding:5px }")
Tiny AJAX
This is a very tiny javascript code to do an AJAX Request:
/*
 m: method ("get", "post")
 u: url
 a: async (true) or sync (false)
 c: callback (with 'xhr' as a parameter)
 d: post_data (the data to post)
*/
function tiny_ajax(m,u,a,c,d){with(new(this.XMLHttpRequest||ActiveXObject)("Microsoft.XMLHTTP"))onreadystatechange=function(){readyState^4||c(this)},open(m,u,a),send(d)}
And an example:
tiny_ajax('get', 'http://www.google.com', true, function(xhr) {
    alert(xhr.responseText)
})
Se connecter à son réseau local via le VPN de la Freebox Revolution
Grâce aux dernières mises à jour de la Freebox Revolution, il est maintenant possible de se connecter à son réseau local depuis l’extérieur. Cela peut être utile pour, par exemple, accéder à un ordinateur de son réseau, etc.
On va d’abord ouvrir l’accès à sa Freebox depuis l’extérieur. Pour ce faire, se rendre sur http://mafreebox.freebox.fr/ puis Paramètres de la Freebox et choisir Gestion des accès. Dans l’onglet paramètres, indiquer un mot de passe, un port et activer l’identification par mot de passe. Conserver l’adresse qui vous est alors fournie. Cette manipulation est utile pour pouvoir accéder à votre Freebox à distance et ainsi faire diverses manipulations.
Maintenant, retourner dans Paramètres de la Freebox puis dans l’onglet Mode Avancé : double-cliquer sur l’icône Serveur VPN.
★ Aller d’abord dans Utilisateurs pour en ajouter un nouveau. Laisser “IP Dynamique”.
Ensuite on a le choix entre trois types de VPN :
- OpenVPN Bridgé : qui demande l’installation d’un logiciel sur l’ordinateur distant, mais qui permet d’accéder au réseau local autour de la Freebox
- OpenVPN Routé : qui demande l’installation d’un logiciel sur l’ordinateur distant, mais qui NE permet PAS d’accéder au réseau local autour de la Freebox
- PPTP : qui peut s’utiliser nativement dans Windows, mais qui NE permet PAS d’accéder au réseau local autour de la Freebox
On trouve plusieurs tutoriaux sur le Net concernant le PPTP. Il est pratique si l’on souhaite accéder seulement au contenu de sa Freebox. Par contre si on souhaite voir les autres ordinateurs de son réseau local il faudra utiliser le mode OpenVPN Bridgé.
Donc aller dans OpenVPN Bridgé, cocher la case pour l’activer, laisser les options par défaut, et appliquer. On va alors avoir un fichier de configuration qui va apparaitre en face du nom d’utilisateur créé précédemment :
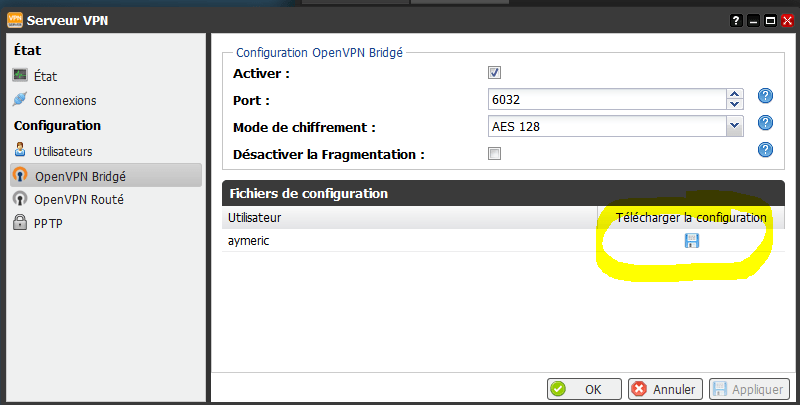
★ Cliquer sur l’icône pour télécharger la configuration.
Maintenant il faut installer OpenVPN sur l’ordinateur distant (donc celui à l’extérieur du réseau local). Il n’y a que la version 2.2.2 d’OpenVPN qui a fonctionné chez moi. Elle est disponible sur cette page : https://openvpn.net/index.php/open-source/downloads.html.
Une fois installé, mettre le fichier de configuration téléchargé précédemment dans le répertoire config/ du répertoire d’installation d’OpenVPN. Lancer OpenVPN GUI sur l’ordinateur distant : il devrait demander un nom d’utilisateur et un mot de passe. Il faut entrer le nom d’utilisateur/password créé précédemment.
Si tout se passe bien, la connexion va alors s’établir. Vous aurez ainsi accès à votre réseau local. Par exemple si une de vos machines a l’IP 192.168.0.1, vous pourrez la pinguer, ou vous pourrez la redémarrer.
Redémarrer un ordinateur à distance
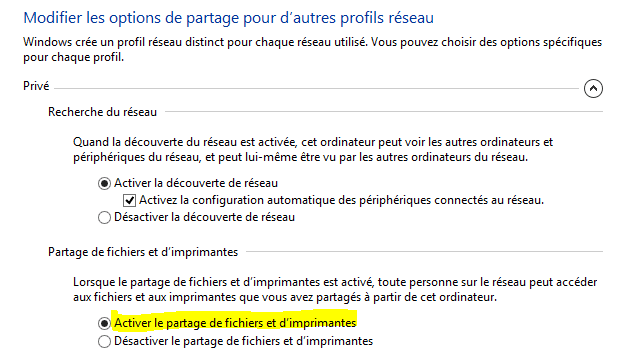
Tout d’abord, sur l’ordinateur qu’on souhaite faire redémarrer, il faut se rendre dans : Panneau de Configuration → Réseau et Internet → Centre réseau et partage → Modifier les paramètres de partage avancés puis Activer le partage de fichiers et d’imprimantes dans “Privé” :
Ensuite il faut ouvrir la base de registre avec la commande regedt32.exe et aller à HKEY_LOCAL_MACHINE\SOFTWARE\Microsoft\Windows\CurrentVersion\Policies\System. Faites un clic-droit sur “System” et choisir Nouveau > Valeur DWORD (32bits). Appeler la nouvelle variable en LocalAccountTokenFilterPolicy et lui attribuer la valeur 00000001.
Enfin lancer la stratégie de sécurité avec la commande secpol.msc. Aller dans Stratégie Locale → Attribution des droits utilisateur et chercher Forcer l’arrêt à partir d’un système distant. Ajouter l’utilisateur de l’ordinateur.
Maintenant sur l’ordinateur distant taper : net use \\IP_ORDINATEUR_DISTANT et il va demander d’entrer un nom d’utilisateur (mettre celui indiqué dans l’étape précédente) et le mot de passe associé. Ensuite utiliser la commande shutdown /r /m \\IP_ORDINATEUR_DISTANT (voir l’aide pour le détail des commandes)
Cette manipulation permet de corriger l’erreur Access is denied.(5) qui arrive lorsqu’on tente la commande shutdown.
Constant network activity with Android
I’ve had a recent issue with my Android 4.4 phone causing a constant network activity and draining my battery like crazy. After searching over Internet I found that could be due to one of my devices on my local network (because of a packet broadcast). I disconnected everything, but no luck. Then I installed an app from the store to find which apps are using my battery, but it states it was Android System…
Some forum posts said that could be some ICMP traffic due to the phone trying to reach the Google servers, or something similar.
Finally I installed several applications to monitor my phone. The best one was “Network Log” that is able to show the trafic received/sent for each application. I found that one of my app might be the issue: I uninstalled it and the trafic stopped!
So I recommend this app to find out which app could be the reason of the bad network activity.
How to change the Firefox portable main window icon? [Astuce]
If you use Firefox Portable in the same time as the regular Firefox, then it can be annoying to see the same icons for the both Firefox. You can easily change the icon for the main window of the portable version of Firefox. Just find the .ico you want to use and place it into this folder : FirefoxPortable\App\Firefox\browser\chrome\icons\default\main-window.ico
If the folders don’t exist, then create them. Also you have to rename your icon to main-window.ico. When it’s done, just close and reopen Firefox.
That works for, at least, Firefox 27. If you use an older version of Firefox you may want to try this different folder : FirefoxPortable\App\Firefox\chrome\icons\default\main-window.ico
Show the full content of a Sharepoint Calendar event box
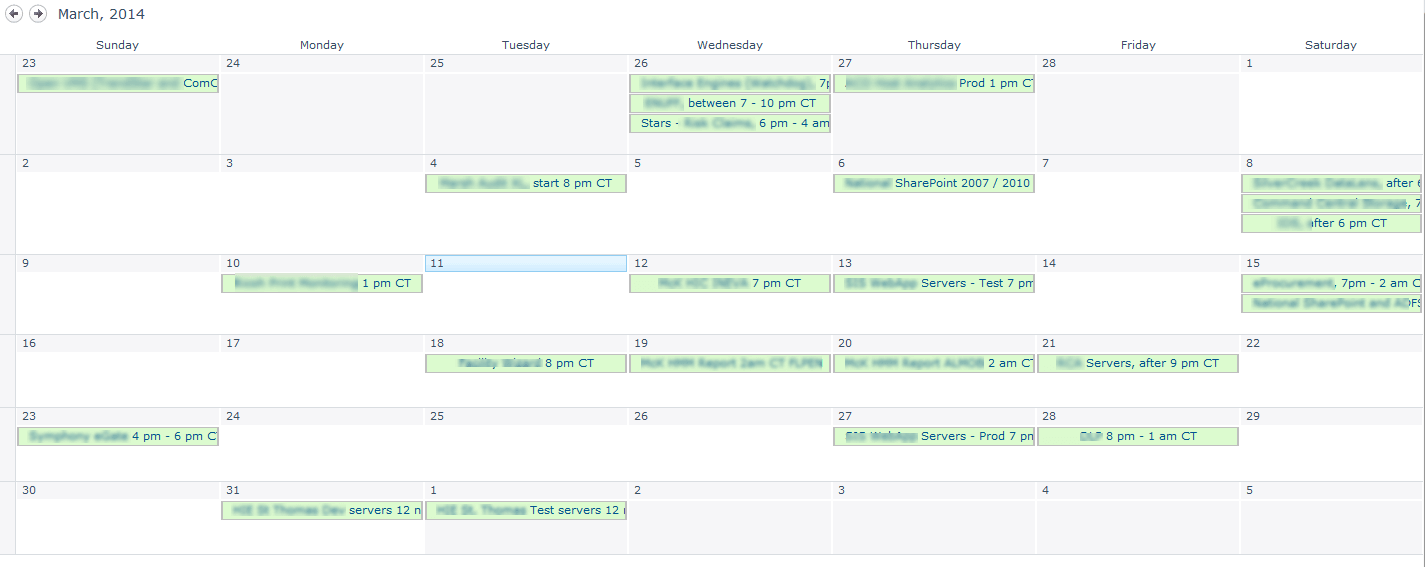
With a Sharepoint Calendar the events with a long title/description are cropped and you cannot see the full description, except if you move your mouse over it.
Example:
So I’ve had to do some CSS and a complicated JavaScript code to be able to create some large boxes. Now we are able to see the full content title/description of the event.
The result is below:
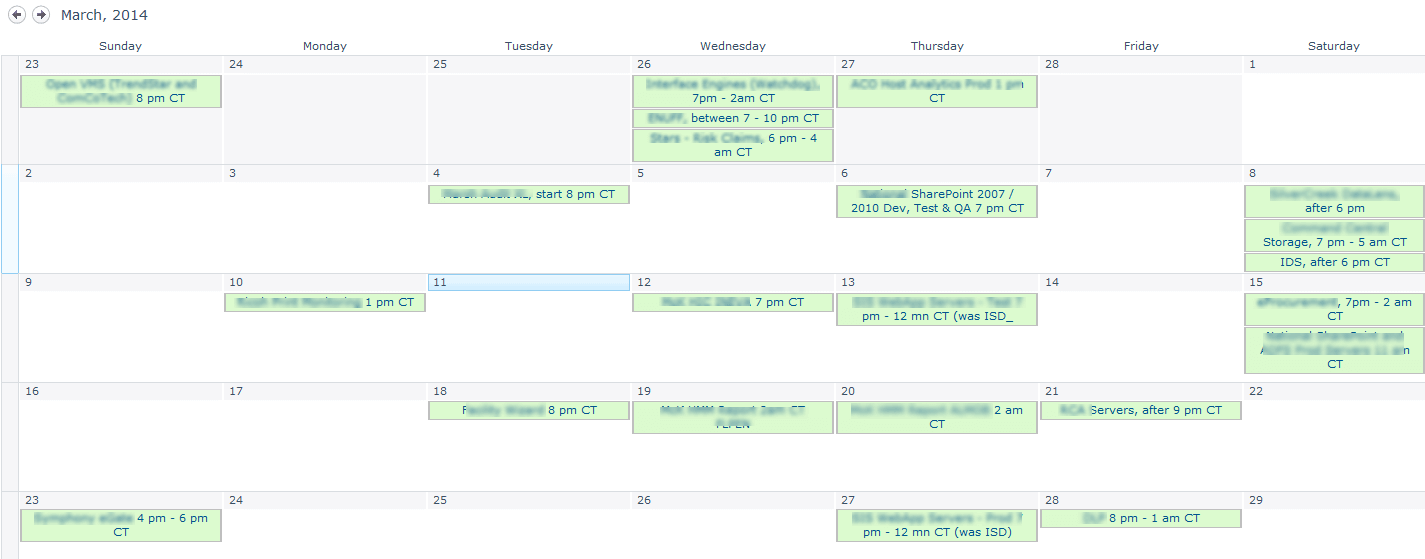
As you can see, the boxes for the events are now bigger!
To do so, you’ll have to insert the below code into your page:
<style type="text/css">
.ms-acal-rootdiv div {
  overflow: visible;
  white-space: normal;
}
.ms-acal-item { height:auto !important }
.ms-acal-outday { height:100% !important }
</style>
<script type="text/javascript" src="//code.jquery.com/jquery-1.11.0.min.js"></script>
<script type="text/javascript">
// load the function after the events are loaded
_spBodyOnLoadFunctionNames.push('changeCalendarEventLinkIntercept');
function changeCalendarEventLinkIntercept() {
  var OldCalendarNotify4a = SP.UI.ApplicationPages.CalendarNotify.$4b;
  SP.UI.ApplicationPages.CalendarNotify.$4b = function () {
    OldCalendarNotify4a();
    setTimeout(function() { showFullEvents() }, 250)
  }
}
// on resize the boxes must be replaced
$(window).on('resize', function() {
  setTimeout(function() { showFullEvents() }, 500)
});

function showFullEvents() {
  var prevPos={bottom:0,left:0};
  var minHeight=0,savedHeight=0,savedMinHeight=0,diffHeight=0;
  var aRows=jQuery('.ms-acal-summary-itemrow');

  // set the same size for each row
  aRows.each(function() {
    var h=$(this).outerHeight();
    if (savedMinHeight<h) savedMinHeight=h;
    // save the current height of the row
    $(this).data("saved-height",h)
  }).each(function() { $(this).css("height",savedMinHeight+"px"); });

  savedHeight=savedMinHeight;

  // move the events
  jQuery('.ms-acal-item').each(function() {
    var $this=$(this);
    var pos=$this.position();
    var height=$this.outerHeight();
    var bottom=pos.top+height;
    minHeight+=height;
    // check if the current event is hover the previous one
    if (prevPos.left === pos.left && prevPos.bottom>pos.top) {
      $this.css("top",(1+prevPos.bottom)+"px")
      bottom += prevPos.bottom-pos.top + 1;
      minHeight+=2;
    }
    // check if we need to make the cell bigger
    if (prevPos.left !== pos.left && savedMinHeight<minHeight) {
      diffHeight=minHeight-savedHeight; // diffHeight will permit to move down all the events later
      savedMinHeight=minHeight;
      jQuery('.ms-acal-summary-itemrow > td').css("height",minHeight+"px")
    }
    if (prevPos.left !== pos.left) minHeight=0
    prevPos={bottom:bottom,left:pos.left};
  })

  if (diffHeight>0) {
    var prevDiff=0,diff=0,prevRow=0;
    jQuery('.ms-acal-item').each(function(idx) {
      var $this=$(this);
      // find index that defines the row
      var row=1*$this.attr("_index").split(",")[0];
      if (idx===0 || prevRow!=row) {
        prevDiff=diff;
        diff+=savedMinHeight-aRows.eq(row).data("saved-height");
      }
      if (row > 0) $this.css("top",($this.position().top+prevDiff+2)+"px")
      prevRow=row;
    })
  }
}
</script>
The code could be more clean, but I did that during an evening after a long day of work, so I’m just happy that it’s working. If you’re able to produce a cleaner code, please share it with me!
To give some explanations :
- The CSS permits to wrap the text and make the colored boxes bigger
- The problem starts when there are more than 1 event in a day because the boxes hover each other
- So with JavaScript we have to calculate which boxes are hover the others, and then move them down
- But if you move the boxes, you also have to make the cells bigger…
- And if the cells are bigger, then you need to move down the events/boxes that are in the below row
- And finally, when the window is resized, Sharepoint is moving them around, so the script has to execute again after a resize.
Tested only with Sharepoint 2010, with IE7+, Firefox and Chrome.