I had the scenario where when files are updated in a specific folder of a SharePoint Documents Library, then the folder should be copied to another document library.
Because we don’t want the copy process to trigger for ever changes (like if we bulk upload files, or if someone is doing changes in live in a file), so here is my solution:
- Create a SharePoint List called “File Processing” with two fields:
- A lookup field called “File” that is based on our source Document Library – make sure to select the option “Enforce unique values”;
- A Date and Time field called “LastModified”.
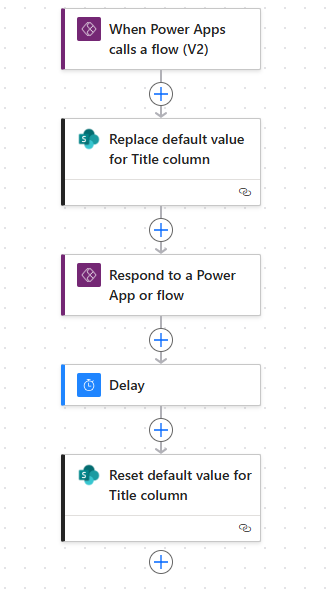
- Create a Power Automate Flow that is manually triggered – we’ll call it with “Run a Child”: this one is only used to do the copy of the folder from source to destination
- Create a Power Automate Flow that triggers when a file is created or modified (properties only):
- When we confirm the file updates happened in the correct folder, then we add an entry in the “File Processing” list with the file ID and the file Modified date;
- Terminate the flow.
- Create a Power Automate Flow that triggers when an item is created or modified in the “File Process” list:
- Add a “Delay” of 5 minutes;
- Add the action “Get file properties” from our source document library using the file ID from the item;
- Check with a condition if the field “LastModified” is greater or equal to the Modified date of the file:
- If yes, then use the action “Get items” on the “File Processing” list to see if we have any other items in the list: if no other items, run the child process to make the copy – and, finally, delete the current item in “File Processing” whatever there is other items or not;
- If no, then update the field “LastModified” of the current item using the Modified date of the file.
This solution permits to only trigger the copy process when there is no more files update in the folder.
Note: if we nee to monitor different folders in the source library, we can add a lookup column in “File Process” that contains the folder ID, and when checking if there is no other items for the folder, we just add a condition based on the folder ID.