• Home
  • A Propos
  • Greasemonkey
  • HowTo GitHub
  • Performance JavaScript
  • SharepointPlus

7

Nov

Capture HTTP(S) traffic from Android using a sniffer

Posted by Aymeric  Published in Android, Debug, English, Niveau expert, Windows

I wanted to debug an Android app that uses HTTPS requests with a JSON API. Thanks to this article I’ve been able to use my Windows 10 computer to get all the network from my Android phone thru my local network and decode the HTTPS requests !

I’m going to summarize the steps from the above article:

  1. Download and Install Fiddler on your computer
  2. Once Fiddler is installed, launch it and:
    • Click menu Tools > Options, then select the Connections tab
    • Make note of the “Fiddler listens on” port (normally it’s 8888)
    • Make sure the check box for “Allow remote computer to connect” is checked
    • Switch to the HTTPS tab
    • Make sure the check boxes for “Capture HTTPS Connects” and “Decrypt HTTPS traffic” are both checked
    • Restart Fiddler
  3. Go to your Android phone then:
    • Tap on Settings, then Wi-Fi
    • Find the network on which you’re connected (normally the first one listed), then tap and hold
    • Choose Modify network from the pop-up
    • Scroll down and enable “Show advanced options”
    • Change “Proxy settings” to Manual
    • Under “Proxy host name” enter the Windows PC IP address from above
    • Under “Proxy port” enter the Fiddler port from above (usually 8888)
    • Tap Save and wait a moment for the network to reconnect
  4. Now we need to add the certificate in Android to have the HTTPS working:
    • On Android start the Chrome browser
    • Navigate to http://IP_ADDRESS_WHERE_FIDDLER_IS:8888/ or http://ipv4.fiddler:8888
    • Tap on the link for the “Fiddler Root Certificate”
    • Name the certificate “Fiddler” and install it (entering your PIN or password if prompted)

You’re now ready to capture the traffic on Fiddler!

Once you’re done you can switch back to normal by following the below steps:

  1. Tap on Settings, then Wi-Fi
  2. Find the network on which you’re connected (should be the first one listed), then tap and hold
  3. Choose Modify network from the pop-up
  4. Scroll down and select (enable) “Show advanced options”
  5. Change “Proxy settings” to None
  6. Tap Save and wait a moment for the network to reconnect
  7. Go up a level in settings to Security
  8. Tap Trusted credentials, then select the User tab
  9. Tap on the Fiddler “Do not trust” certificate, then scroll down to remove it
  10. You may need to power cycle your device to get all apps to forget about the Fiddler certificate (e.g., the Chrome browser will continue to try to use it for a while)

Tags: android, Debug, english, Niveau expert, Windows

no comment

26

Juil

Android 5.1.1 system rw Operation not permitted

Posted by Aymeric  Published in Android, Niveau expert

I was trying to update my Sony Xperia Z3 Compact from Android 5.0.2 (rooted) to Android 5.1.1, and everything worked well except that I got this issue : mount: Operation not permitted
when I was trying to put in write mode the system folder.

Also I tried SDFix and I got the error “Update failed, platform.xml file could not be updated”.

When I tried “ES Explorer”, with Root Mode, I had SuperSU asking for root permission, but then “ES Explorer” said my system is not rooted.

After hours of digging I finally found I had to use that file discovered in that XDA thread. Just download it, unzip, then launch the install.bat

Tags: android, Niveau expert

no comment

20

Mai

Android Lollipop – problème de microphone qui ne fonctionne plus

Posted by Aymeric  Published in Android, Niveau intermédiaire

J’ai un Sony Xperia Z3 Compact et, soudainement, le micro s’est arrêté de fonctionner. Je suis passé sous Lollipop il y a quelques jours. Après investigation, cela est peut-être dû à l’utilisation de mon casque pour écouter de la musique… J’ai donc effectué quelques recherches pour trouver un correctif, et c’est finalement venu du Issue Tracker d’Android. Voici la marche à suivre :

  • Activer le mode Développeur en allant dans Paramètres > A propos du téléphone > puis tapoter plusieurs fois sur Numéro de build jusqu’à ce qu’un message apparaisse disant que le mode développeur est activé
  • Ensuite dans Paramètres > Options pour les développeurs > il faut décocher, dans multimédia, l’option qui s’appelle NuPlayer (expérimental)
  • Redémarrer le téléphone

Pour moi cette méthode a fonctionné. N’hésitez pas à cliquer sur l’étoile sur le Tracker d’Android concernant ce problème afin que Google s’occupe de publier un correctif.

Tags: android, Niveau intermédiaire

1 comment

7

Juil

Installer Android KitKat 4.4.4 sur le Sony Xperia Z1 Compact

Posted by Aymeric  Published in Android

La dernière version d’Android est disponible pour le Xperia Z1 Compact, et on trouve tous les tutoriaux nécessaires sur http://www.phonandroid.com :

  1. D’abord il faut télécharger la ROM
  2. Ensuite on l’installe
  3. Puis on peut rooter son téléphone
  4. Et enfin on peut installer un recovery

Tags: android

no comment

17

Mai

Constant network activity with Android

Posted by Aymeric  Published in Android, Astuce

I’ve had a recent issue with my Android 4.4 phone causing a constant network activity and draining my battery like crazy. After searching over Internet I found that could be due to one of my devices on my local network (because of a packet broadcast). I disconnected everything, but no luck. Then I installed an app from the store to find which apps are using my battery, but it states it was Android System…

Some forum posts said that could be some ICMP traffic due to the phone trying to reach the Google servers, or something similar.

Finally I installed several applications to monitor my phone. The best one was “Network Log” that is able to show the trafic received/sent for each application. I found that one of my app might be the issue: I uninstalled it and the trafic stopped!

So I recommend this app to find out which app could be the reason of the bad network activity.

Tags: android

no comment

25

Août

Configurer SFR LIBERTALK en SIP sur Android et iPhone (avec media5fone)

Posted by Aymeric  Published in Android, Astuce, Divers, Niveau débutant

EDIT : SFR a fermé le service le 2 janvier 2017 (annonce sur le forum SFR)

Il est possible d’activer le SIP chez SFR. Pour ce faire, il faut se rendre sur son compte SFR et dans les jours qui suivent vous recevrez votre mot de passe par courrier.

Une fois le courrier reçu il s’agit de configurer correctement l’application SIP. Ici nous utiliserons l’application media5fone qui est disponible sur iOS et Android.

Point de vue configuration voici les éléments qu’il vous faut.

Tout d’abord, sur l’écran d’accueil, vous devez choisir “Paramètres SIP personnalisés > Définir manuellement”.
Dans “Titre” vous pouvez entrer “SFR LIBERTALK”.
Dans “Nom d’utilisateur” entrez +3399{Votre numéro de ligne sur 10 caractères} (Exemple: +33990123456789)
Dans “Mot de passe”, celui qui vous a été envoyé par courrier.
Allez dans “Serveurs” :

  • Pour l’adresse SIP entrez l’adresse “ims.mnc010.mcc208.3gppnetwork.org”
  • Pour le port il faut mettre 5064
  • Concernant le “serveur proxy sortant”, vous devez l’activer (“Activer Proxy”).
  • Dans l’adresse du proxy entrez “internet.p-cscf.sfr.net”
  • Dans le port du proxy il faut mettre 5064
  • Activez l’option “Retirer header Route”
  • Maintenant dans la section “Autre” modifiez “Interval d’enregistrement (sec)” avec la valeur 3600
  • Activez aussi “Utiliser rport” dans cette même section

Une fois validé, il va essayer de se connecter et ne va pas réussir, il faut aller dans l’option “Avancé” du compte pour y arriver.
Dans “Avancé” :

  • Configurer le “compte utilisateur”, avec “ID Appelant” qui est “{Votre numéro de ligne sur 10 caractères}” (exemple: 0123456789)
  • Le “Nom d’authentification” est “NDI{votre numéro de ligne sur 10 caractères}.LIBERTALK@sfr.fr” (exemple: NDI0123456789.LIBERTALK@sfr.fr)
  • Descendez plus bas jusqu’à la section “SIP Features” et changez “Méthode de transfert” en “BYE”

Et voilà, après avoir validé, et en étant connecté sur du WiFi, vous devriez pouvoir passer tous les appels que vous souhaitez !

Plus d’infos dans l’assistance de SFR et sur le forum de SFR

4 comments

9

Juil

Update the Toshiba Folio 100 to CyanogenMod 9 (ICS) [Tutorial]

Posted by Aymeric  Published in Android, Niveau expert

This is for the Alpha5 of CM9 available on XDA. The ROM is available on GitHub: https://github.com/DerArtem/android_device_toshiba_betelgeuse/downloads (called “update-cm-9.0.0-RC0-2012.04.21-betelgeuse-UNOFFICIAL-signed.zip” here).
Download it from the link above.

I have currently the FolioMod’s Dexter and Windows 7 (64 bits)

Install Android SDK

Go to the Android SDK page and install the package. Make sure you install the Google USB Drivers also after the installation is complete.

Here I have installed the SDK into D:\ANDROID\android-sdk

Once it’s done you want to test if your device is recognized by your computer. Switch it on and plug in it. Then open a Windows console (Windows key + R, then type “cmd”) and go to your installation directory. Then go to the “platform-tools” directory. It will be something like that: > cd D:\ANDROID\android-sdk\platform-tools
You should see the “adb.exe” file. You can call it with the command adb.exe devices

If it returns the message “< Waiting for devices >”, then it means you need to do some tricks :

  • On your Folio, go to the Settings > Applications > USB Debug : make sure this is checked
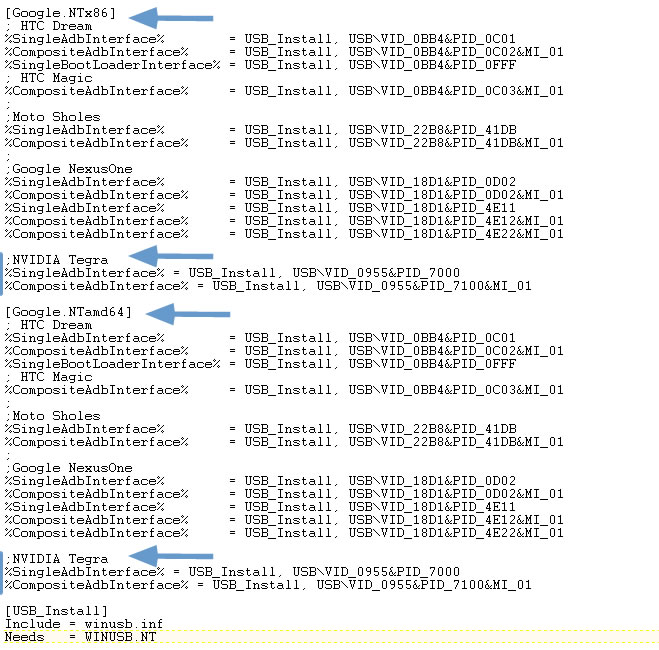
  • On your computer, find the file called android_winusb.inf (in my case it’s located here: D:\ANDROID\android-sdk\extras\google\usb_driver), and open it with a text editor. We now need to copy/paste the three lines below at the end of the [Google.NTx86] part and at the end of the [Google.NTamd64] part :

    ;NVIDIA Tegra
    %SingleAdbInterface% = USB_Install, USB\VID_0955&PID_7000
    %CompositeAdbInterface% = USB_Install, USB\VID_0955&PID_7100&MI_01


    Credits – http://philflash.inway.fr/flex/folio100/usb_tegra2.html

  • Save the file and close it. Now type the command echo 0x955 > "%USERPROFILE%\.android\adb_usb.ini" into the console.
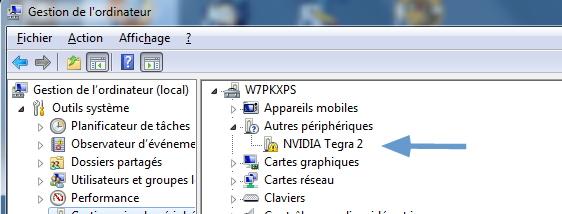
  • Now unplug/replug your Folio and click right on the Computer icon that you have on your desktop or into the Windows explorer, and choose “Manage”. From there you can manage the devices and under “Other devices” you should see the “NVIDIA Tegra2” :

    Credits – http://philflash.inway.fr/flex/folio100/usb_tegra2.html
  • Click right on it and pick “Update the driver” and choose the “Locate it on my computer” option. For the path it will be D:\ANDROID\android-sdk\extras\google\usb_driver in my case
  • You’ll probably have a warning message, but say yes, that you want it to be installed
  • When it’s done you should now see “Android Composite ADB Interface” instead of “NVIDIA Tegra 2”
  • In the Windows console you can now type the below commands (in the “platform-tools” directory) :

    adb kill-server
    adb start-server
    adb devices

  • Your Folio must now appear in the list of devices

Bootload

First, rename the ROM downloaded as “update.zip” and copy it to your SDCard (at the root dir). (In the mean time copy also the Google Apps zip file)

We’re going to install the recovery :

  • Copy the cwm-recovery-5.5.0.4.img file you’ve downloaded into the “platform-tools” folder.
  • Switch off your Folio (keep it plugged to your computer).
  • Switch it on, and when it vibrates then press three times the Power button, then the Volume UP button : you’ll see a message saying it’s in fastboot mode.
  • In the Windows console type : fastboot.exe flash recovery cwm-recovery-5.5.0.4.img
  • The message “flashing mbr to device” will appear.
  • Press several seconds the Power button to turn it off, then turn it on. When the first messages appear on the screen press the Power button and the Volume UP button. You’ll see some text.
  • Make sure to go to the Update System mode (it should be : Volume UP + Volume Down + Volume Up), and you’ll have the Recovery menu. From here I recommend to do a backup (“backup and restore > backup to internal sdcard”) (the Power button permits to validate the choices, and the Volume to go up and down)

Install the new ROM

After the backup you can do a “wipe data/factory reset”. Then install the ROM in choosing the “Install zip from SDCard” option.

At the end of the process the Folio will say “Install from sdcard complete.”

It’s now time to reboot to use CM9 🙂

Install Google Apps

Reboot your Folio. When it vibrates, press the Power button and the Volume UP in the same time. Then go to the System Update (Volume Up + Down + Up), and install the GAPPS file.

Tags: android, Niveau expert, tutorial

no comment

24

Fév

Hack de la BBox pour Android [Astuce]

Posted by Aymeric  Published in Android, Application, Astuce, Niveau intermédiaire, Programmation, Sécurité

[niveau intermédiaire]

EDIT: une application Android existe maintenant pour BBox (et autres box) : Penetrate.

La nouvelle a rapidement fait le tour du web : le mot de pass wifi par défaut de la BBox de Bouygues Telecom se retrouve très facilement à partir du nom du réseau (appelé SSID). Ainsi on trouve un script pour Windows, et un autre pour Linux.
J’ai décidé de transcrire ce script pour Android grâce au projet Android Scripting.

Comment cela fonctionne ?

Il suffit d’installer l’application SL4A. Ouvrez l’application, puis “Menu” et “View”. Choisissez “Interpreters”, puis “Menu” et “Add”. Prenez “Python” dans la liste proposée. Cela va télécharger l’interpréteur Python que vous devrez installer, puis ouvrir, et enfin suivre les instructions.

Ensuite il vous faut récupérer le script python : hack_bbox_Android.py

Maintenant connectez votre téléphone à l’ordinateur, activez le périphérique de stockage USB, et allez dans dans le répertoire “sl4a” qui doit se trouver à la racine, puis placez le script dans… “scripts” 🙂

Déconnectez votre téléphone de l’USB, et lancez SL4A, et enfin le script nommé “Hack_BBox_android.py”.

Votre téléphone (ou votre tablette) va vous montrer les réseaux Wifi disponibles autour de vous (pensez à activer le wifi avant!). Il suffit d’en choisir un qui commence par BBox pour que le script se mette à chercher la clé correspondante. Selon la puissance de votre téléphone, l’opération peut prendre jusqu’à 15 min (temps constaté sur un HTC Hero, alors qu’il faut que 2 min sur une tabelette Toshiba Folio 100).

Captures d’écran :


Tags: android, Astuce, hack, Programmation, Sécurité, wifi

2 comments

6

Fév

Carte SD endommagée sur un téléphone Android [stockage]

Posted by Aymeric  Published in Android, Niveau expert

[niveau expert]

Avec mon téléphone HTC Hero sous Android j’ai eu la mauvaise surprise de voir un jour un message m’indiquant “Carte SD Endommagée”, m’empêchant d’utiliser cette petite carte qui stocke pas mal d’informations (dans mon cas une carte SanDisk de 2Go).

Un formatage habituel n’avait pas d’effet, j’ai dû donc passer par un formatage de bas niveau (attention, cela supprime toutes les données de la carte de façon définitive!) afin d’effacer complètement et durablement toutes les données de la carte. Pour cela, mon téléphone utilisant une rom alternative (CyanogemMod), j’ai pu le redémarrer en mode “recovery”.
Commencez par relier votre téléphone au PC Windows, puis dans les options au redémarrage il suffit de choisir “partitions menu”. Ensuite sélectionnez “mount /sdcard”, puis “mount USB storage”. Normalement Windows devrait détecter votre carte SD. A partir de là vous pouvez tenter de récupérer les données les plus importantes mais vous risquez plusieurs erreurs.

Maintenant nous allons passer à un formatage de bas niveau de la carte qui va absolument tout faire disparaitre. Pour se faire vous devez télécharger le logiciel HDD Low Level Format Tool. Une fois installée, choisissez votre SD Card dans la liste des disques et procédez au formatage. Cela pourrait indiquer un tas d’erreurs, mais ignorez les. Une fois terminé, fermer le programme.

Maintenant, dans Windows, faites un clic droit sur la SD Card et choisissez l’option “Formater”. Prenez “FAT32”, et laissez les autres options par défaut. Décochez la case “formatage rapide”, puis commencez l’opération. Une fois terminé, vous pouvez redémarrer le téléphone !

Tags: android, formatage, Niveau expert, stockage, Windows

4 comments

9

Sep

Retrouver une clé wifi sur Android [wifi key recovery]

Posted by Aymeric  Published in Android, Niveau expert, Sécurité

[niveau expert]

Il est facile de retrouver les clés wifi (WEP, WPA, …) qui sont déjà stockées sur son téléphone Android. Pour cela vous devez relier le téléphone à votre PC et ouvrir une console en direction du téléphone.

Une fois que vous avez obtenu un shell sur le téléphone, les informations wifi sont stockées dans le fichier :
/data/misc/wifi/wpa_supplicant.conf

Attention : vous devez avoir rooté votre téléphone pour accéder à ce fichier.

Tags: android, clé, Niveau expert, téléphone, wifi

4 comments

Me Suivre

Suivre @aymkdn

Catégories

  • À bookmarker
  • Android
  • Application
  • Astuce
  • Debug
  • Divers
  • English
  • Français
  • Images
  • Linux
  • MacOS
  • Navigateur
  • Niveau débutant
  • Niveau expert
  • Niveau intermédiaire
  • Partage
  • Performance
  • Programmation
  • Sécurité
  • Téléphonie
  • Vidéo
  • Web Design
  • Windows

Étiquettes

android Application Astuce astuces convertisseur css debian Debug débutant email english facebook firefox Français github IE Images intermédiaire internet explorer javascript jquery Linux mysql Navigateur Niveau débutant Niveau expert Niveau intermédiaire Nokia Partage Performance php Programmation regexp sharepoint Sharepoint 2013 sharepointplus Sécurité traitement vidéo téléphone Téléphonie vidéo Web Design Windows wordpress À bookmarker

Méta

  • Flux RSS
  • Administration

Recent Entries

  • Freebox Player API
  • Windows Movie Maker pour Windows 7, Windows 8.1 et Windows 10
  • Mise à jour d’un serveur Kimsufi (OVH) depuis Debian 9 (Stretch) vers Debian 10 (Buster)
  • Connectivity issue with Qualcomm QCA61x4A 802.11ac in 5GHz
  • Let’s Encrypt Certificate: how to remove a domain from a certname that contains several domains
  • Upgrade from MySQL (5.6.40 – Debian 9.12) to MariaDB
  • Sharepoint error message “Invalid URL argument” with WebPartPages
  • chrome-search://local-ntp/local-ntp.html makes Chrome unresponsive
  • Our system has detected an unusual rate of unsolicited mail originating from your IP address
  • Sharepoint REST API to index a column or delete a column and more…

Recent Comments

  • alex91 in Create a self-signed certificate for localhost tes…
  • Coolwriter in Bien configurer eMule [Astuces]
  • Nico in Bien configurer eMule [Astuces]
  • Jim1988 in Permettre le retour en arrière sur une page PHP a…
  • rikimaru11273 in Bien configurer eMule [Astuces]
  • Aymeric in Execute an action before saving a form but after t…
  • liriarte in Execute an action before saving a form but after t…
  • Aymeric in Contrôler la Freebox avec Google Home
  • Jolaclass in Contrôler la Freebox avec Google Home
  • Aymeric in Bien configurer eMule [Astuces]
  • Random Selection of Posts

    • Si vous avez l’erreur “The security validation for this page is invalid” [Sharepoint]
    • New release of SharepointPlus
    • SharePoint 2013 Search REST API options
    • Adding a custom action to a callout in SharePoint 2013
    • Windows 10 et Cortana : lancer les recherches sur Google au lieu de Bing sous Firefox
    • Quelles polices de caractères utilisées sur le web ? [Web Design]
    • Ajouter “nocaptcha reCaptcha” de Google à Guiform sous WordPress [Astuce]
© 2008 Kodono is proudly powered by WordPress
Theme designed by Roam2Rome