Il peut arriver qu’on ait besoin de voir tout le code JavaScript d’une page dans un unique endroit. Pour cela vous pouvez utiliser ce bout de code. Grâce à la partie “bookmarklet” vous pouvez créer un nouveau marque-page et utiliser le code fourni comme URL du marque-page. Ensuite il suffit d’aller sur la page voulue et d’appeler le marque-page : cela ouvrira une nouvelle page avec tout le code JavaScript, qui sera « unminifié » grâce à jsbeautifier.org. Cependant, seuls les scripts qui sont sur le même domaine pourront être visualisés.
L’autocomplete des passwords ne fonctionne plus sur Firefox ? [Astuce]
Après un crash de mon ordinateur je me suis retrouvé avec Firefox qui ne remplissait plus mes zones “Password” sur les différents sites. Plutôt ennuyeux. Après une recherche j’ai trouvé qu’une option s’était décochée d’elle-même ! Il suffit d’aller dans les Options, onglet Sécurité, puis de vérifier que “Enregistrer les mots de passe” est bien coché.
Vertical scroll en JavaScript [programmation]
Si l’on souhaite faire un scroll vertical seulement pour accéder à un élément de notre page, alors on pourra utiliser :
window.scrollTo(document.documentElement.scrollLeft,document.getElementById('id-de-mon-element').offsetTop)
Autre solution (en repérant le conteneur qui a les scrollbar) :
document.getElementById('mon-conteneur').scrollTop = document.getElementById('id-de-mon-element').offsetTop
Pour que offsetTop retourne une valeur il faut que l’élément associé soit visible.
Un autocomplete/autosuggest simple, léger et efficace en JavaScript [programmation]
On trouve plusieurs programmes JavaScript pour l’auto-complétion, mais souvent ils sont lourds et proposent des listes déroulantes plus ou moins attrayantes.
Après quelques recherches je suis tombé sur Mo Autocomplete créé par un russe.
Une fois minifié, le code ne fait que 1423B, et son principe n’est pas d’afficher une liste sous le champ mais de compléter le mot directement dans le champ.
Ci-dessous une démo (tapez un mois de l’année en français) :
Et le code associé :
<input type="text" id="demo-autocomplete" autocomplete="array:months" />
<script>
/* autocomplete - http://momche.net/res/autocomplete/ */
var cAutocomplete={sDescription:"autcomplete class"};cAutocomplete.complete=function(hEvent){if(hEvent==null){var hEvent=window.hEvent}var hElement=(hEvent.srcElement)?hEvent.srcElement:hEvent.originalTarget;var sAA=hElement.getAttribute("autocomplete").toString();if(sAA.indexOf("array:")>=0){hArr=eval(sAA.substring(6))}else{if(sAA.indexOf("list:")>=0){hArr=sAA.substring(5).split("|")}}if(hEvent.keyCode==16){return}var sVal=hElement.value.toLowerCase();if(hEvent.keyCode==8||hEvent.keyCode==46){sVal=sVal.substring(0,sVal.length-1)}if(sVal.length<1){return}for(var nI=0;nI<hArr.length;nI++){sMonth=hArr[nI];nIdx=sMonth.toLowerCase().indexOf(sVal,0);if(nIdx==0&&sMonth.length>sVal.length){hElement.value=hArr[nI];if(hElement.createTextRange){hRange=hElement.createTextRange();hRange.findText(hArr[nI].substr(sVal.length));hRange.select()}else{hElement.setSelectionRange(sVal.length,sMonth.length)}return}}};cAutocomplete.init=function(){var a=0;var c=document.getElementsByTagName("INPUT");for(var a=0;a<c.length;a++){if(c[a].type.toLowerCase()=="text"){var b=c[a].getAttribute("autocomplete");if(b){if(document.attachEvent){c[a].attachEvent("onkeyup",cAutocomplete.complete)}else{if(document.addEventListener){c[a].addEventListener("keyup",cAutocomplete.complete,false)}}}}}};if(window.attachEvent){window.attachEvent("onload",cAutocomplete.init)}else{if(window.addEventListener){window.addEventListener("load",cAutocomplete.init,false)}};
var months=["Janvier","Février","Mars","Avril","Mai","Juin","Juillet","Août","Septembre","Octobre","Novembre","Décembre"];
cAutocomplete.init();
</script>
Avertissement de redirection sur Google [Astuce]
Depuis quelques jours, toutes mes recherches sur Google Images me retournaient un message disant :
Avertissement de redirection
La page que vous consultiez essaie de vous rediriger vers xxxx.
Si vous ne souhaitez pas consulter cette page, vous pouvez revenir à la page précédente.
Message pour le moins agaçant. C’est finalement en supprimant mes cookies que Google a arrêté de me montrer cet avertissement.
Récupérer les détails d’un utilisateur dans une masterpage [Sharepoint]
Il est assez simple de stocker dans un coin d’une masterpage les détails de l’utilisateur pour pouvoir ensuite les réutiliser. Pour cela vous devez rajouter une ligne au début de votre masterpage :
<%@ Register Tagprefix="SPSWC" Namespace="Microsoft.SharePoint.Portal.WebControls" Assembly="Microsoft.SharePoint.Portal, Version=12.0.0.0, Culture=neutral, PublicKeyToken=71e9bce111e9429c" %>
(Attention de bien mettre Version=14.0.0.0 si vous êtes sous Sharepoint 2010, et Version=12.0.0.0 pour Sharepoint 2007)
Maintenant, juste après la balise FORM, il faut ajouter cette ligne :
<form>
  <SPSWC:ProfilePropertyLoader runat="server"/>
  [...]
Voilà, vous pouvez désormais récupérer les informations de l’utilisateur. Il suffit de mettre le bloc suivant entre les balises FORM de votre masterpage :
   <div id="userDetails" style="display:none">
     <asp:LoginName runat="server" id="userLogin">
     <SPSWC:ProfilePropertyValue PropertyName="FirstName" ApplyFormatting="false" id="userFirstName" runat="server"/>
     <SPSWC:ProfilePropertyValue PropertyName="LastName" ApplyFormatting="false" id="userLastName" runat="server"/>
     <SPSWC:ProfilePropertyValue PropertyName="WorkEmail" ApplyFormatting="false" id="userWorkEmail" runat="server"/>
     <SPSWC:ProfilePropertyValue PropertyName="PreferredName" ApplyFormatting="false" id="userPreferredName" runat="server"/>
   </div>
Grâce à ça vous obtenez le nom complet, le username, le prénom, le nom et l’email de l’utilisateur courant.
On peut trouver d’autres propriétés à cette adresse:
Cross-browser solution to read a local file and return the Data URI in base64 [Javascript]
I searched for a solution to have a way to read a local file and then have the Base64 content returned into all the web browsers. The Javascript FileReader API exists for the modern browsers but not for Internet Explorer (IE). The solution is finally with Flash !
Look at the project on http://aymkdn.github.com/FileToDataURI/, and thanks to Country/FileToDataURI.as for the inspiration 🙂
Raccourcis pour SublimeText [Astuce]
Vous connaissez sûrement SublimeText : c’est un éditeur de texte très puissant, et parfait pour la programmation.
J’ai décidé de lister les commandes/raccourcis qui sont bien utiles :
- CTRL + d : sélectionnez un mot puis faire CTRL+d pour voir les autres mots identiques être sélectionnés à leur tour à chaque nouvelle pression du raccourci, ce qui permet ensuite de modifier tous les mots sélectionnés d’un seul coup… à utiliser en collaboration avec CTRL+K+D qui permet de désélectionner le dernier mot identique et de sélectionner le suivant;
- CTRL + SHIFT + UP/DOWN : permet de déplacer vers le haut ou vers le bas la ligne sur laquelle le curseur se trouve;
- CTRL + SHIFT + P : va appeler une console rapide qui permet d’accéder aux fonctionnalités des menus… par exemple si vous voulez activer la syntaxe Javascript pour un nouveau fichier il suffit de faire CTRL+SHIFT+P et de taper “syntax javascript”;
- CTRL + Clic : il est possible de placer plusieurs curseurs dans son document en maintenant CTRL et en cliquant, et lorsque vous tapez le texte apparait à la suite de tous les curseurs créés;
Tous les raccourcis sont décrits dans la documentation sur http://docs.sublimetext.info/en/latest/reference/keyboard_shortcuts_win.html
Update the Toshiba Folio 100 to CyanogenMod 9 (ICS) [Tutorial]
This is for the Alpha5 of CM9 available on XDA. The ROM is available on GitHub: https://github.com/DerArtem/android_device_toshiba_betelgeuse/downloads (called “update-cm-9.0.0-RC0-2012.04.21-betelgeuse-UNOFFICIAL-signed.zip” here).
Download it from the link above.
I have currently the FolioMod’s Dexter and Windows 7 (64 bits)
Install Android SDK
Go to the Android SDK page and install the package. Make sure you install the Google USB Drivers also after the installation is complete.
Here I have installed the SDK into D:\ANDROID\android-sdk
Once it’s done you want to test if your device is recognized by your computer. Switch it on and plug in it. Then open a Windows console (Windows key + R, then type “cmd”) and go to your installation directory. Then go to the “platform-tools” directory. It will be something like that: > cd D:\ANDROID\android-sdk\platform-tools
You should see the “adb.exe” file. You can call it with the command adb.exe devices
If it returns the message “< Waiting for devices >”, then it means you need to do some tricks :
- On your Folio, go to the Settings > Applications > USB Debug : make sure this is checked
- On your computer, find the file called android_winusb.inf (in my case it’s located here:
D:\ANDROID\android-sdk\extras\google\usb_driver), and open it with a text editor. We now need to copy/paste the three lines below at the end of the [Google.NTx86] part and at the end of the [Google.NTamd64] part :
;NVIDIA Tegra
%SingleAdbInterface% = USB_Install, USB\VID_0955&PID_7000
%CompositeAdbInterface% = USB_Install, USB\VID_0955&PID_7100&MI_01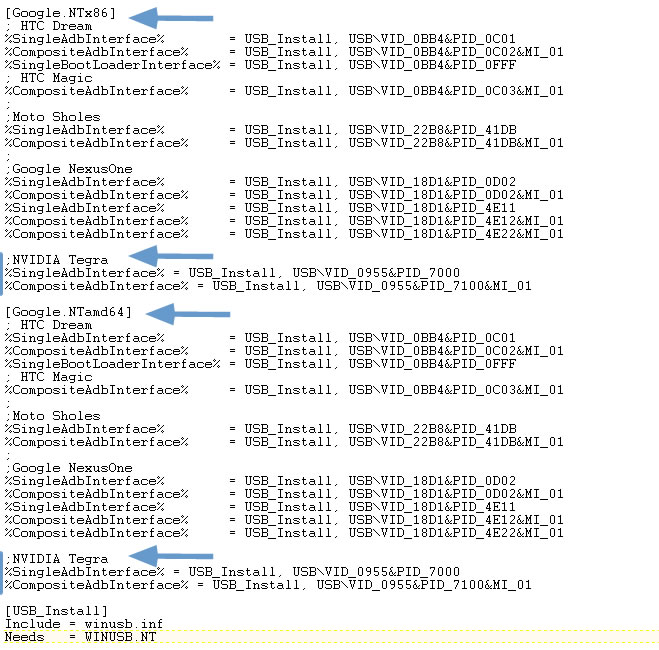
Credits – http://philflash.inway.fr/flex/folio100/usb_tegra2.html - Save the file and close it. Now type the command
echo 0x955 > "%USERPROFILE%\.android\adb_usb.ini"into the console. - Now unplug/replug your Folio and click right on the Computer icon that you have on your desktop or into the Windows explorer, and choose “Manage”. From there you can manage the devices and under “Other devices” you should see the “NVIDIA Tegra2” :
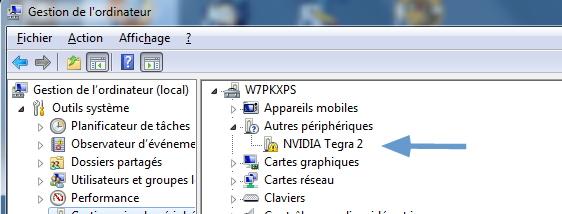
Credits – http://philflash.inway.fr/flex/folio100/usb_tegra2.html - Click right on it and pick “Update the driver” and choose the “Locate it on my computer” option. For the path it will be
D:\ANDROID\android-sdk\extras\google\usb_driverin my case - You’ll probably have a warning message, but say yes, that you want it to be installed
- When it’s done you should now see “Android Composite ADB Interface” instead of “NVIDIA Tegra 2”
- In the Windows console you can now type the below commands (in the “platform-tools” directory) :
adb kill-server
adb start-server
adb devices - Your Folio must now appear in the list of devices
Bootload
First, rename the ROM downloaded as “update.zip” and copy it to your SDCard (at the root dir). (In the mean time copy also the Google Apps zip file)
We’re going to install the recovery :
- Copy the cwm-recovery-5.5.0.4.img file you’ve downloaded into the “platform-tools” folder.
- Switch off your Folio (keep it plugged to your computer).
- Switch it on, and when it vibrates then press three times the Power button, then the Volume UP button : you’ll see a message saying it’s in fastboot mode.
- In the Windows console type :
fastboot.exe flash recovery cwm-recovery-5.5.0.4.img - The message “flashing mbr to device” will appear.
- Press several seconds the Power button to turn it off, then turn it on. When the first messages appear on the screen press the Power button and the Volume UP button. You’ll see some text.
- Make sure to go to the Update System mode (it should be : Volume UP + Volume Down + Volume Up), and you’ll have the Recovery menu. From here I recommend to do a backup (“backup and restore > backup to internal sdcard”) (the Power button permits to validate the choices, and the Volume to go up and down)
Install the new ROM
After the backup you can do a “wipe data/factory reset”. Then install the ROM in choosing the “Install zip from SDCard” option.
At the end of the process the Folio will say “Install from sdcard complete.”
It’s now time to reboot to use CM9 🙂
Install Google Apps
Reboot your Folio. When it vibrates, press the Power button and the Volume UP in the same time. Then go to the System Update (Volume Up + Down + Up), and install the GAPPS file.
Convertir une vidéo .mov au format cinéma DCP [tutorial]
Je me suis aidé du blog Home Mad DCP pour effectuer cette tâche qui semble un peu difficile au premier abord… A noter qu’il y a aussi le blog de hd3g qui propose un petit guide pour la création d’un DCP qui devrait vous aider.
Voici un autre tutoriel : http://www.projectionniste.net/docs/tutoriel-creation-dcp-open-dcp.pdf
(Remarque : malgré tous mes efforts je n’ai pas réussi à avoir un fichier qui soit lu correctement par le projecteur… je vous propose quand même ce regroupement d’étapes que j’ai pu trouver)
Je pars de la supposition suivante : vous possédez un fichier MOV (mais ça marche pour les AVI aussi apparemment) qui fait 1920×1080 (qu’il soit 24 trames/sec ou 25 trames/sec). Aussi on va travailler sous Windows (7 64bits dans mon cas).
On va supposer que notre répertoire de travail est D:\DCP\ avec notre vidéo qui se nomme “video.mov” et qui se trouve dans notre répertoire de travail.
Enfin il vous faut un certain nombre de connaissances de Windows comme l’utilisation des commandes dans cmd, le téléchargement et dézippage de fichiers, etc.
Convertir notre vidéo en images TIF
Créer un sous-répertoire “tif_rgb” dans “DCP” où nous placerons nos images tif que nous allons créer avec ffmpeg.
Pour ffmpeg, voici quoi faire :
- Aller sur http://ffmpeg.zeranoe.com/builds/ pour télécharger ffmpeg (vous choisirez “64-bit Builds (Static)” si vous êtes avec un Windows 64bits, ou “32-bit Builds (Static)” si vous avez un 32bits)
- Dézipper le fichier dans votre répertoire de travail et renommer le répertoire créé en “ffmpeg”
- Ouvrez une console de commande (touche Windows + R) puis tapez
cmd, et se placer dans le répertoire “ffmpeg” - Entrer maintenant dans le sous-répertoire “bin”
Maintenant si vous tapez “ffmpeg.exe” vous devriez avoir un message qui commence par une phrase du genre :
ffmpeg version N-42288-g8293a21 Copyright (c) 2000-2012 the FFmpeg developers built on Jul 5 2012 21:00:02 with gcc 4.7.1
Vous êtes prêt à convertir votre vidéo. Pour cela je me suis aidé des explications du blog Home Made DCP et des commentaires du billet.
Pour moi, la commande qui a fonctionné est la suivante :
D:\DCP\ffmpeg\bin> ffmpeg.exe -i "D:/DCP/video.mov" -r 24 -s 1920x1080 -filter:v yadif -vf pad=2048:1080:64:0:black -pix_fmt rgb24 "D:/DCP/tif_rgb/%05d.tif"
Ici on va ajouter des bandeaux noirs pour que notre vidéo fasse le format 2K des salles de cinéma.
Convertir les images TIF en JPEG2000
Vous devez maintenant télécharger OpenDCP pour Windows donc (vous avez le choix entre une version 32 ou 64bits).
Installer le logiciel puis le lancer.
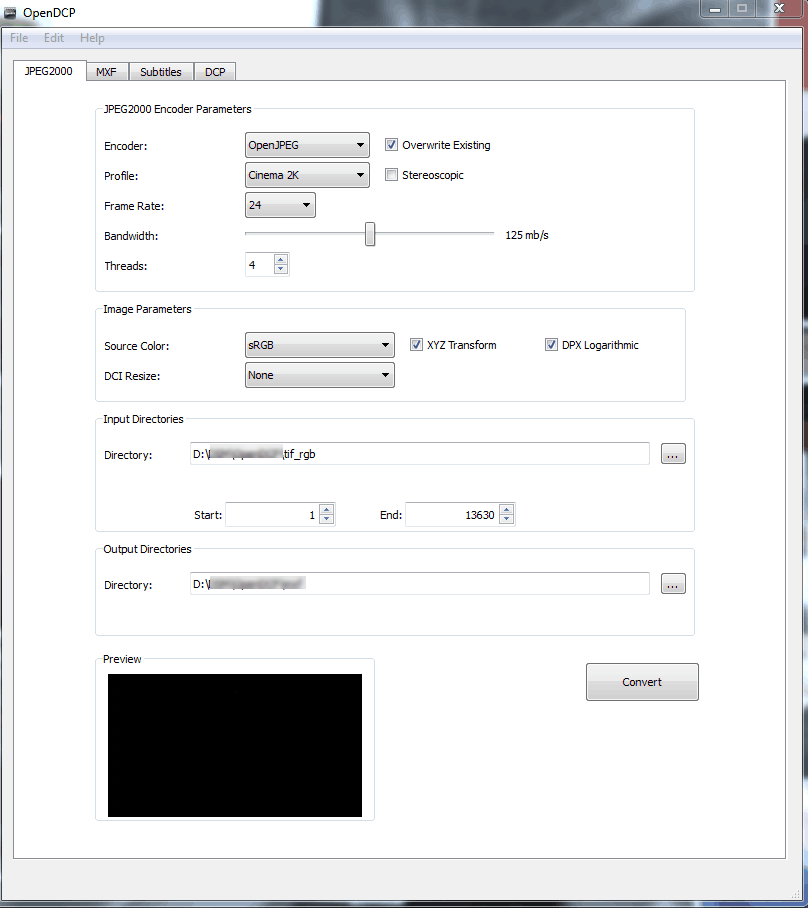
On tombe sur un onglet JPEG2000 (vous pouvez trouver les explications sur les différentes options sur Home Made DCP). Personnellement j’ai gardé toutes les options par défaut et j’ai simplement choisi mon répertoire “tif_rgb” comme “Input Directory” et comme “Output Directories” j’ai créé un répertoire nommé “j2c”.
Une fois nos répertoires sélectionnées il suffit de cliquer sur “Convert”.
Passage par le stade XMF
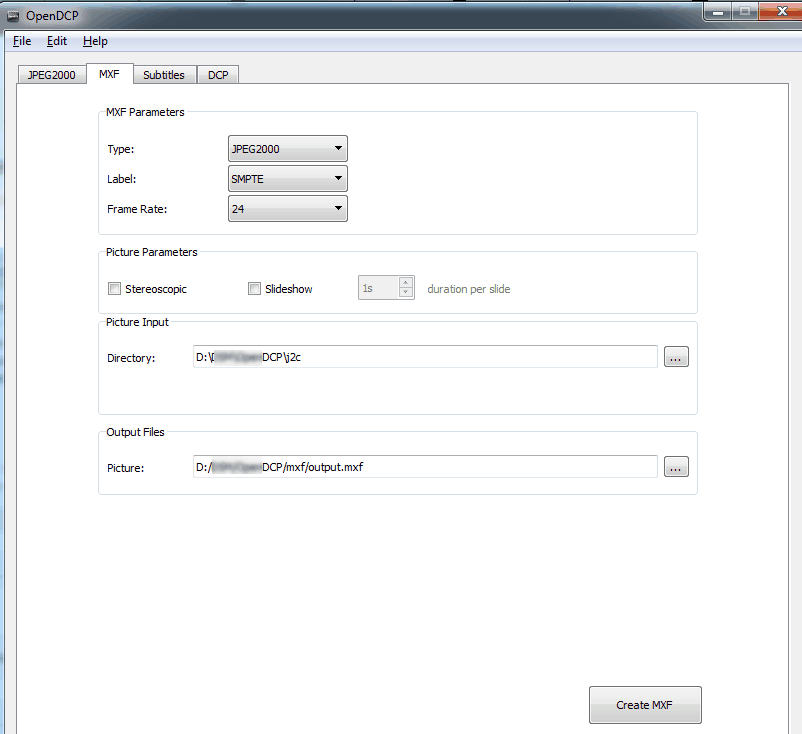
Créer un répertoire “xmf” dans votre répertoire de travail, puis dans OpenDCP, aller sur l’onglet XMF. Dans “Picture input” on choisit le dossier “j2c” et dans “Output” on va aller dans “xmf” et enregistrer un fichier avec le nom “output_video.xmf” par exemple.
Il faut maintenant extraire la bande son de notre vidéo
Pour cela on va utiliser de nouveau ffmpeg (on en parle encore sur Home Made DCP), et on va également télécharger et installer Sox.
Une fois fait on utilise de nouveau la console CMD et en se plaçant dans le répertoire “bin” de “ffmpeg”. Cette fois on lance la commande ci-dessous :
ffmpeg.exe -y -i "D:\DCP\video.mov" -vn -f wav "D:\DCP\bande_son.wav"
Cela va donc vous créer le fichier “bande_son” qu’il faut maintenant séparer en deux pistes. C’est là où “sox” va aider. Vous devez d’abord trouver où il s’est installé. Chez moi l’exécutable est C:\Program Files (x86)\sox-14-4-0\sox.exe, et dans votre console vous tapez d’abord :
"C:\Program Files (x86)\sox-14-4-0\sox.exe" --show-progress --temp . -V3 "D:\DCP\bande_son.wav" --endian little --channels 1 --bits 24 --encoding signed-integer --rate 48000 "D:\DCP\bande_son-24b-L.wav" norm -12 remix 1
On lance ensuite :
"C:\Program Files (x86)\sox-14-4-0\sox.exe" --show-progress --temp . -V3 "D:\DCP\bande_son.wav" --endian little --channels 1 --bits 24 --encoding signed-integer --rate 48000 "D:\DCP\bande_son-24b-R.wav" norm -12 remix 2
Cela a eu pour effet de créer deux fichiers audio normalisés (un pour la gauche et l’autre pour la droite).
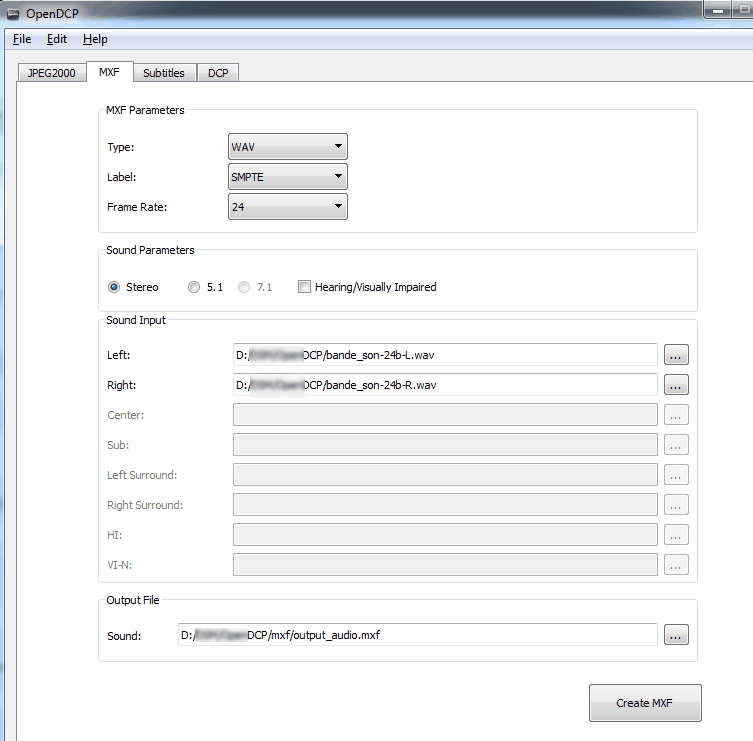
Maintenant on retourne dans OpenDCP et dans l’onglet MXF. Cette fois on va choisir comme source “wav” et “stereo”. Il nous suffit de sélectionner notre fichier gauche, et notre fichier droit, et de sauver le fichier “output_audio.mxf” dans notre répertoire “mxf” :
Création des fichiers XML
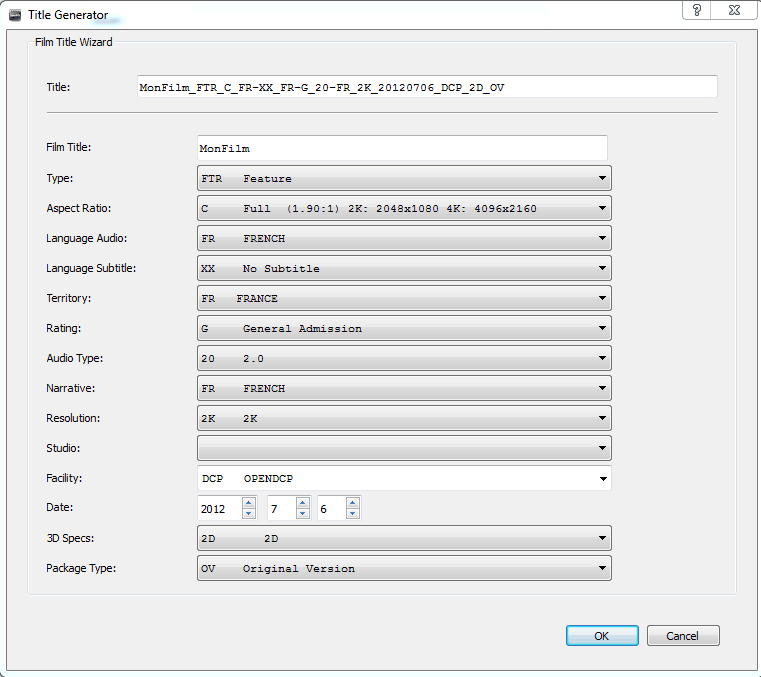
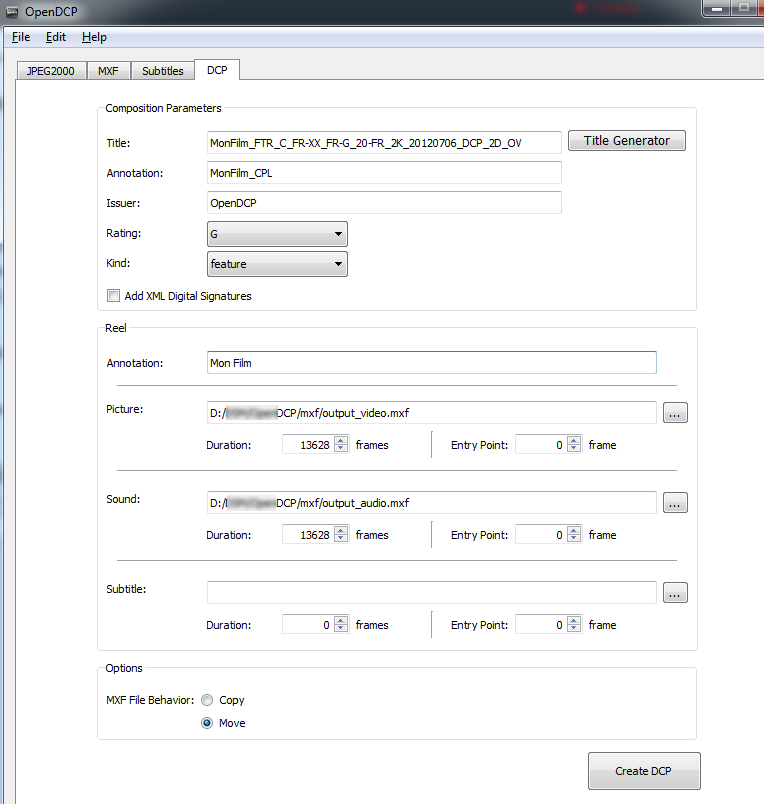
Il nous reste à créer les fichiers XML. Pour cela aller dans l’onglet “DCP” du logiciel OpenDCP. On va commencer par cliquer sur le bouton “Title Generator” et on complète les différentes questions. Enfin on choisit notre “output_video.mxf” et “output_audio.mxf” et on laisse la magie opérée :
Pour conclure
Vous devriez maintenant avoir ces fichiers qui forment votre DCP :
- un MXF pour la vidéo en JPEG2000 (output_video.mxf)
- un MXF pour l’audio en WAV PCM (output_audio.mxf)
- un fichier VOLINDEX.xml (trivial) qui appelle un ASSETMAP
- un fichier ASSETMAP.xml qui référence les deux XML, ainsi qu’un CPL et un PKL
- un fichier *_cpl.xml qui référence votre programme : durée, ratio, titre, etc…
- un fichier *_pkl.xml qui identifie les deux MXF : taille, hash (sha256), mime type.