We could simply check the resolution or user agent:
const isMobile = Math.min(window.screen.width, window.screen.height) < 768 || navigator.userAgent.indexOf("Mobile") > -1;
We could simply check the resolution or user agent:
const isMobile = Math.min(window.screen.width, window.screen.height) < 768 || navigator.userAgent.indexOf("Mobile") > -1;
For Apache, in the folder sites-available, you need to create your the-new-one.your-domain.com.conf file. Then enable the new site with a2ensite the-new-one.your-domain.com.
You can list all domains associated with a certificate:
certbot certificates
Now we add the SSL using certbot. You need to list all the existing domains and add the new one:
certbot --apache --cert-name your-domain.com -d first.your-domain.com,second.your-domain.com,third.your-domain.com,the-new-one.your-domain.com
If you need to get an email from an Azure DevOps work item (e.g. from the “Changed By” field), it might be tricky in Power Apps Flow because it will return “John Doe <john@doe.com>”.
To only extract the email from this string, you’ll have to use the below:
first(split(last(split([YOUR_FIELD],'<')),'>'))
It’s super handy to be able to switch between two tabs in the web browser… But it’s tricky to set it up in Chrome!
LEFT CTRL and TABIt should now work to switch between tabs using LEFT CTRL + TAB.
Il faut régulièrement penser à mettre à jour son serveur Kimsufi.
Je vais essayer d’expliquer brièvement les étapes à suivre pour cela.
apt-get update && apt-get upgrademkdir /root/svg_special; cp -R /var/lib/dpkg /root/svg_special/; cp /var/lib/apt/extended_states /root/svg_special/; dpkg --get-selections "*" > /root/svg_special/dpkg_get_selection; cp -R /etc /root/svg_special/etc
screen pour pouvoir se reconnecter (avec screen -r) à en cas de déconnexion :
screen
aptitude search '~i(!~ODebian)'
aptitude search '~o'
aptitude purge '~o'
dpkg --audit pour s’assurer que tout est bon avant la migration. On peut également taper dpkg --get-selections "*" | more et vérifier qu’aucun paquet n’est en on hold/etc/apt/sources.list par des “bullseye” (on pourra par exemple utiliser sed -i 's/buster/bullseye/g' /etc/apt/sources.list)
On vérifiera aussi les fichiers qui se trouvent dans /etc/apt/sources.list.d, en modifiant par exemple la source pour MariaDB.
J’ai également dû remplacer la ligne deb http://security.debian.org/ bullseye/updates main contrib non-free de mon fichier /etc/apt/sources.list par deb http://security.debian.org/debian-security bullseye-security main contrib non-free.
/usr/bin/script pour enregistrer une transcription de la session de mise à niveau. Ainsi, quand un problème survient, on a un enregistrement de ce qui s’est passé. Pour démarrer un enregistrement, taper :
script -t 2>~/upgrade-buster.time -a ~/upgrade-buster.script
apt-get update
apt -o APT::Get::Trivial-Only=true full-upgrade
apt-get upgrade
apt full-upgrade
Cette dernière étape va durer un certain temps. Une fois terminé, vous pouvez redémarrer le serveur pour s’assurer que tout va bien.
Il est bien de vérifier que la version actuelle de PHP est correctement utilisée par Apache et qu’elle correspond à ce qu’on veut. Pour cela on vérifie la version avec:
php -v
Ensuite on regarde les versions de PHP disponibles dans les modules d’Apache :
ls -l /etc/apache2/mods-available/php*
Et on regarde celle activée :
ls -l /etc/apache2/mods-enabled/php*
On regarde également dans le dossier des modules pour vérifier quelle version on a :
ls -l /etc/apache2/modules/libphp*
Si la version souhaitée est manquante dans les modules, alors on l’installe, par exemple pour la 7.4 :
apt-get install php7.4 php7.4-mysql
On s’assure ensuite de bien activer la bonne version, par exemple en passant de la v7.0 à v7.4 :
a2dismod php7.0
a2enmod php7.4
Et on redémarre Apache :
systemctl restart apache2
Une fois les erreurs corrigées, on va nettoyer tous les paquets avec :
apt-get autoremove
Note : pour arrêter screen on fait CTRL + A puis k.
(This is a corrected version of this blog post)
nvm-noinstall.zip from the latest release.nvm-noinstall.zip (i.e.: nvm.exe …) into the bin folder inside of the portable Cmder folder.bin.install_fix.cmd that contains this code.bin folder and type .\install_fix.cmdbin folder.settings.txt has been created in the your Cmder bin folder.bin folder.nvm install latest.bin folder, there should be a new folder containing the latest Node version (e.g. v17.3.0).From there, you can use the full path to your Cmder bin + the Node version folder + node.exe to execute something with this version of Node using Powershell, CMD or other terminal.
For example:
PS D:\experiments\my-stuff\> D:\experiments\nodejs-portable\cmder_mini\bin\v17.3.0\node.exe index.js
You could use Cmder with the Node path in the Startup Settings of the app; e.g. set "PATH=D:\experiments\nodejs-portable\cmder_mini\bin\v17.3.0;%PATH%". This way, in Cmder, when typing node.exe it’s the portable version that will be used.
In the PHPBB directory, edit the file .htaccess and after RewriteRule ^(.*)$ app.php [QSA,L] you can enter:
RewriteCond %{HTTPS} off
# First rewrite to HTTPS:
# Don't put www. here. If it is already there it will be included, if not
# the subsequent rule will catch it.
RewriteRule .* https://%{HTTP_HOST}%{REQUEST_URI} [L,R=301]
# Now, rewrite any request to the wrong domain to use www.
RewriteCond %{HTTP_HOST} !^www\.
RewriteRule .* https://www.%{HTTP_HOST}%{REQUEST_URI} [L,R=301]
(inspired by this blog post)
Download the smalidea plugin (see also the related Github Repository).
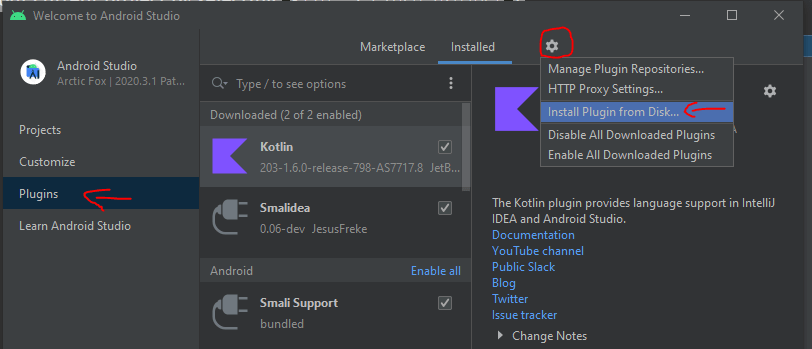
Open up Android Studio and you should see the welcome screen like the one on screenshot below (if not, close your current project by selecting File -> Close project), go to the Plugins section, and from the wheel icon, select Install Plugin from Disk.... Select the smalidea plugin (ZIP file) you downloaded.
You first need to know the type of platform where you’ll do your debug tests. To do so, make sure your device is connected to your computer (it could also be a virtual device started from the AVD Manager) with adb devices.
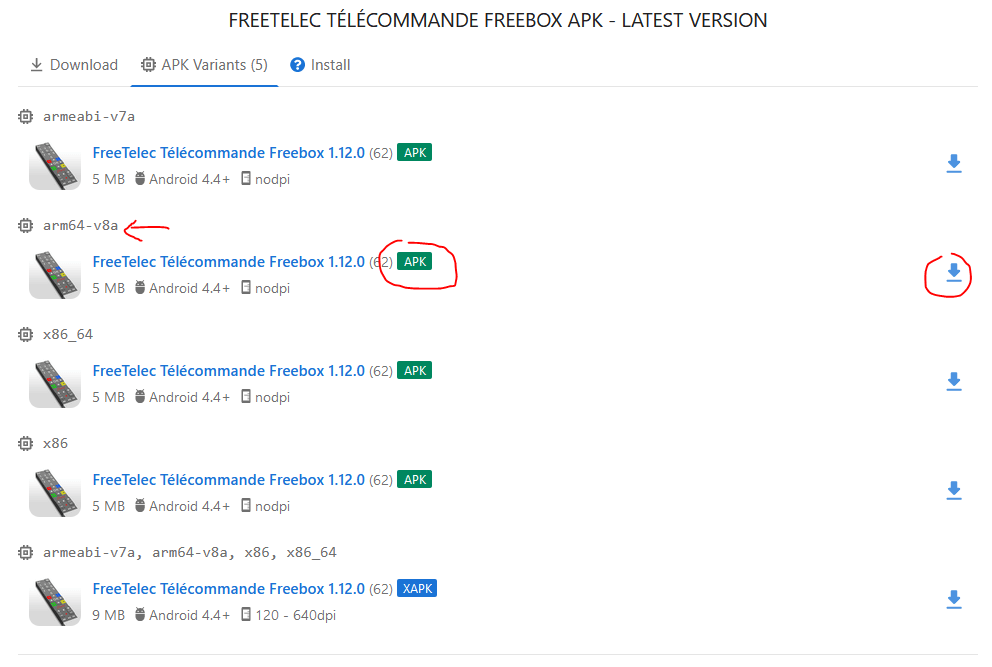
Then, use the command adb shell getprop ro.product.cpu.abi to find the type of processor you have. When I use my phone, I got arm64-v8a.
Go to an APK platform, like https://apkcombo.com/ and search for the Android app you want to debug. Download the APK version that fits to the type you found before:
You can use JADX to open the APK and have a quick look at the code.
With APKTool, we’ll use the command: .\apktool.bat d ".\the_original_app_from_apkcombo.com.apk" -o app_to_debug.
A folder called app_to_debug is created with the decompiled version of the application.
Next, we need to copy the source files: create a folder called “src” in the new app_to_debug folder, and type cp -R smali*/* src/.
Open an existing Android Studio project and select the app_to_debug folder where you unpacked APK.
Once the project loads, you need to tell the IDE where is your source code. Make sure you’re using the “Project view” in the left side panel:
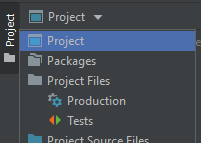
Now you can see folder structure in your left panel. Find src/ subfolder right click it and select Mark Directory as -> Sources Root.
Open AndroidManifest.xml from the app_to_debug and find the XML element <application>. Add the attribute android:debuggable with value “true”. Example:
<application android:debuggable="true" android:allowBackup="true" android:icon="@mipmap/ic_launcher" android:label="@string/app_name" android:largeHeap="true" android:name="org.horaapps.leafpic.App" android:theme="@style/Theme.AppCompat">
You can now repack to APK with the command .\apktool.bat b -d ".\app_to_debug\" -o app_unsigned.apk
You first need a keystore using keytool and type the below command:
keytool -genkeypair -v -keystore mykey.keystore -alias mykey -keyalg RSA -keysize 2048 -validity 10000
Several questions you’ll be asked, as well as a password. Make sure to remember the password for later.
You then need zipalign that can be found in the Android SDK folder (e.g. C:\Users\USERNAME\AppData\Local\Android\Sdk\build-tools\31.0.0\zipalign.exe) to validate your APK:
.\Path\to\Android\Sdk\build-tools\31.0.0\zipalign.exe -f -v 4 .\app_unsigned.apk .\app_ready.apk
Finally you can sign the new created APK with apksigner:
.\Path\to\Android\Sdk\build-tools\31.0.0\apksigner.bat sign --ks .\mykey.keystore --ks-key-alias app_to_debug --out .\app_signed.apk .\app_ready.apk
You can install it using adb install app_signed.apk
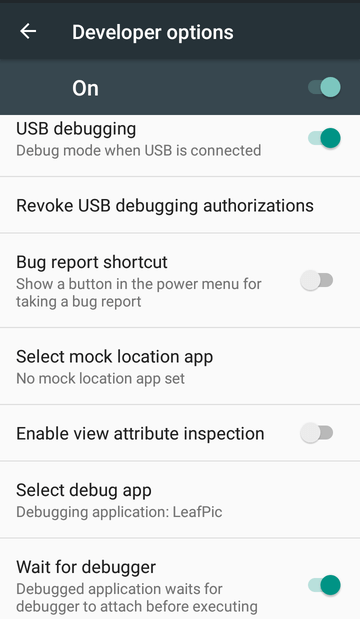
On your Android device, go to Settings -> Developer options and set USB debugging and Wait for debugger options on. The latter is optional but useful as it allows you wait for debugger connection and not to run app yet.
Finally, you should tap on Select debug app and choose the app you just installed. After all of these, your Developer options menu should look somewhat like this:
Now, launch the app on the Android device, and you’ll get the below message:
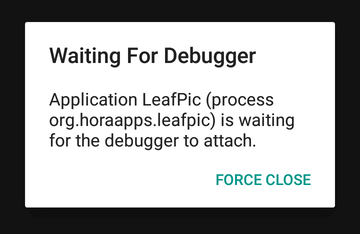
You can use the adb’s port forwarding feature and forward JDWP service where application’s debug interface is listening.
Find the JDWP port with the command adb jdwp, then use this port with the command:
adb forward tcp:5005 jdwp:JDWP_PORT
Go to Android Studio and from its top menu bar choose Run -> Debug…, then a small message appears with one unique option that is Edit Configurations.... There, in the window, use a plus (+) button at the opt left, and add a new configuration of type Remote. Leave the default configuration as is. Click the Debug button and your app should be running with the attached debugger which means it will stop once a breakpoint is hit and you can investigate the content of app’s variables.
I’m using CapacitorJS for easy development with Android. I needed a way to do an HTTPS request to a box that uses self-signed SSL certificate. To accomplish it, I created my own capacitor plugin.
See this wiki page for details: https://github.com/Aymkdn/assistant-freebox-cloud/wiki/Capacitor-Plugin-for-HTTP-requests-with-self-signed-SSL-certificates
It’s as easy as editing the web.config file with the below:
<?xml version="1.0" encoding="UTF-8"?>
<configuration>
  <system.webServer>
    <httpProtocol>
      <customHeaders>
        <add name="Access-Control-Allow-Origin" value="https://my.site.com" />
        <add name="Access-Control-Allow-Headers" value="Authorization,Accept,Content-Type,X-Requested-With" />
        <add name="Access-Control-Allow-Credentials" value="true" />
      </customHeaders>
    </httpProtocol>
  </system.webServer>
</configuration>