The only way to pass a URL parameter to a SharePoint Online (modern design) form’s field is to use PowerApps (at least, if you cannot add any JS on your website!).
Important warning: when you use PowerApps to manage your form, all edits to the list settings won’t reflect to the PowerApps form. For example, if you add a field, it won’t show up, and you’ll have to manually update the PowerApps to add it (see at the bottom of this article).
From the list view, go to Integrate then PowerApps and Customize forms:

Once PowerApps has open the form, you need to do several things.
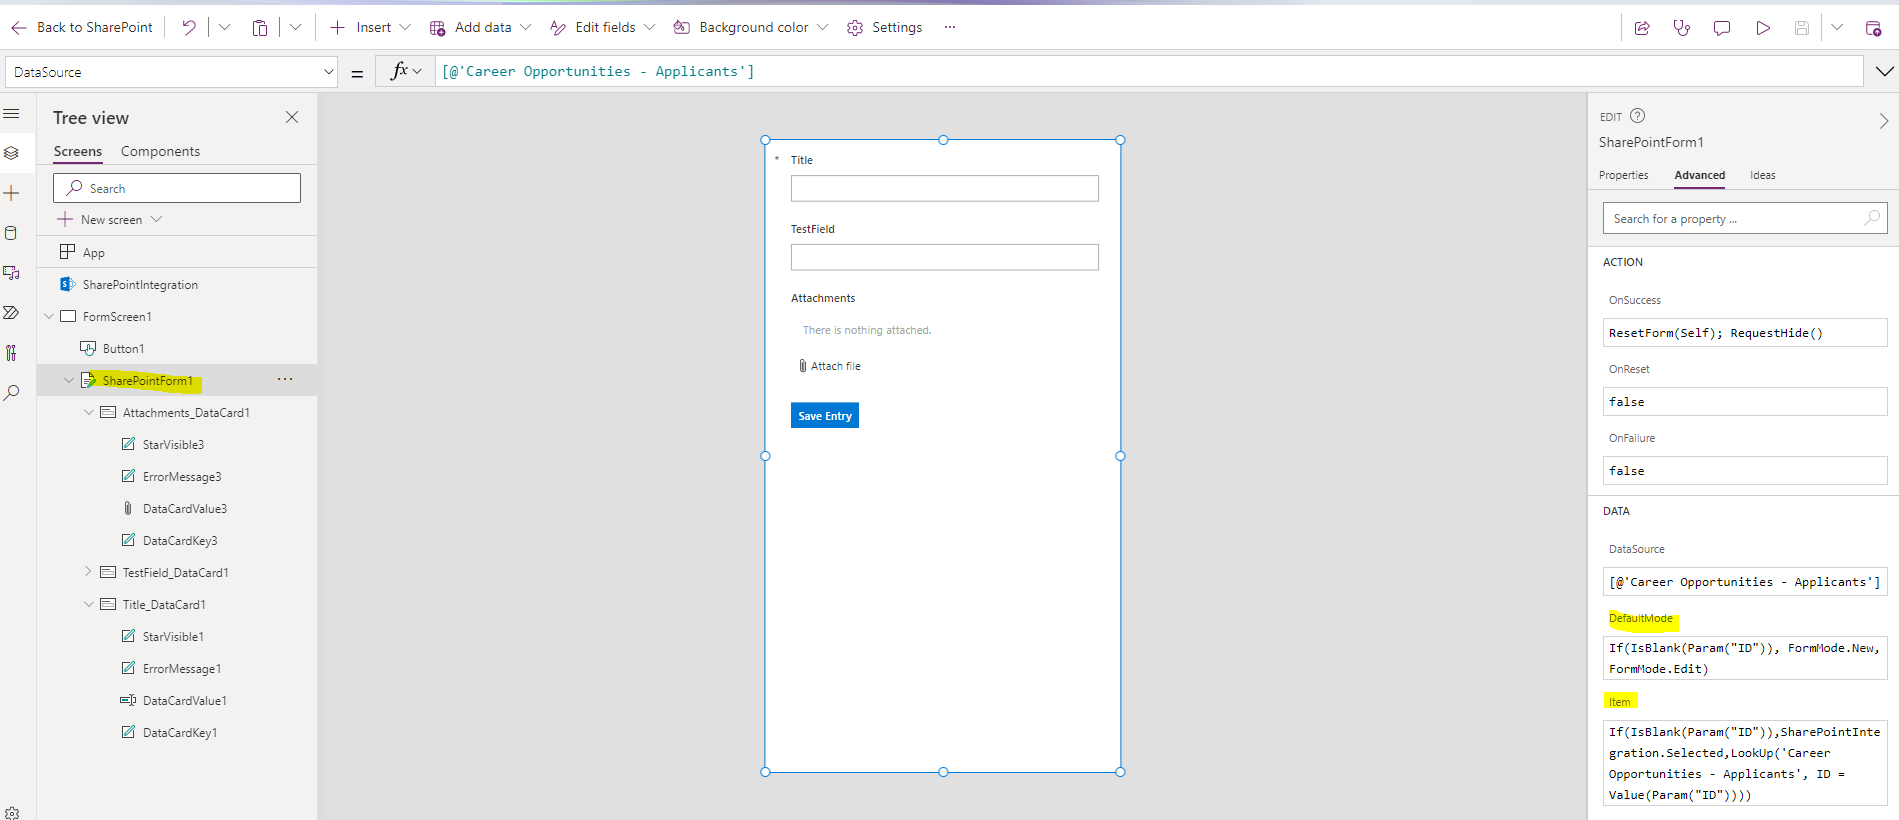
1. Load the ID
We first need to make sure the form will load the required item when we pass the ID URL parameter:
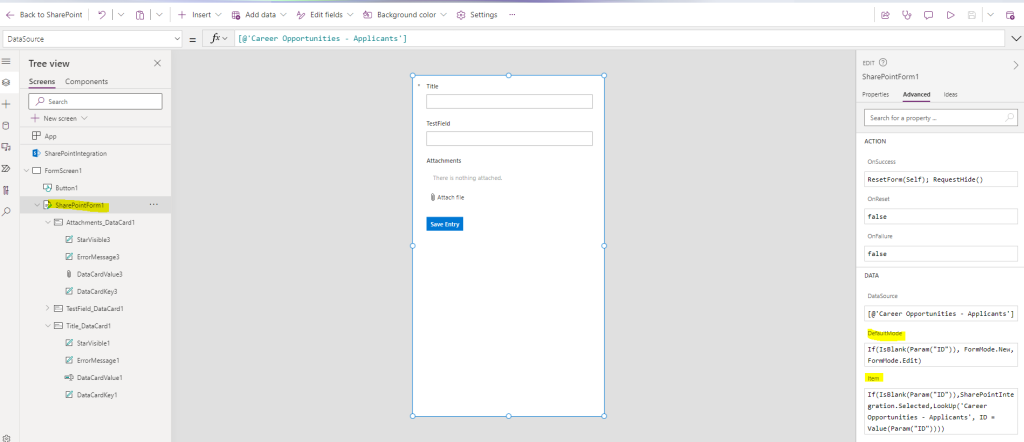
From the SharepointForm Advanced Settings, we change the DefaultMode to check if we have the ID parameter, and if we don’t have it, then it should be a New Form, otherwise an Edit Form:
If(IsBlank(Param("ID")), FormMode.New, FormMode.Edit)
From the SharepointForm Advanced Settings, we change the Item section to check if we have the ID parameter, and if we have it, then we do a lookup in our list to find the data:
If(IsBlank(Param("ID")), SharePointIntegration.Selected, LookUp('NAME OF THE LIST', ID = Value(Param("ID"))))
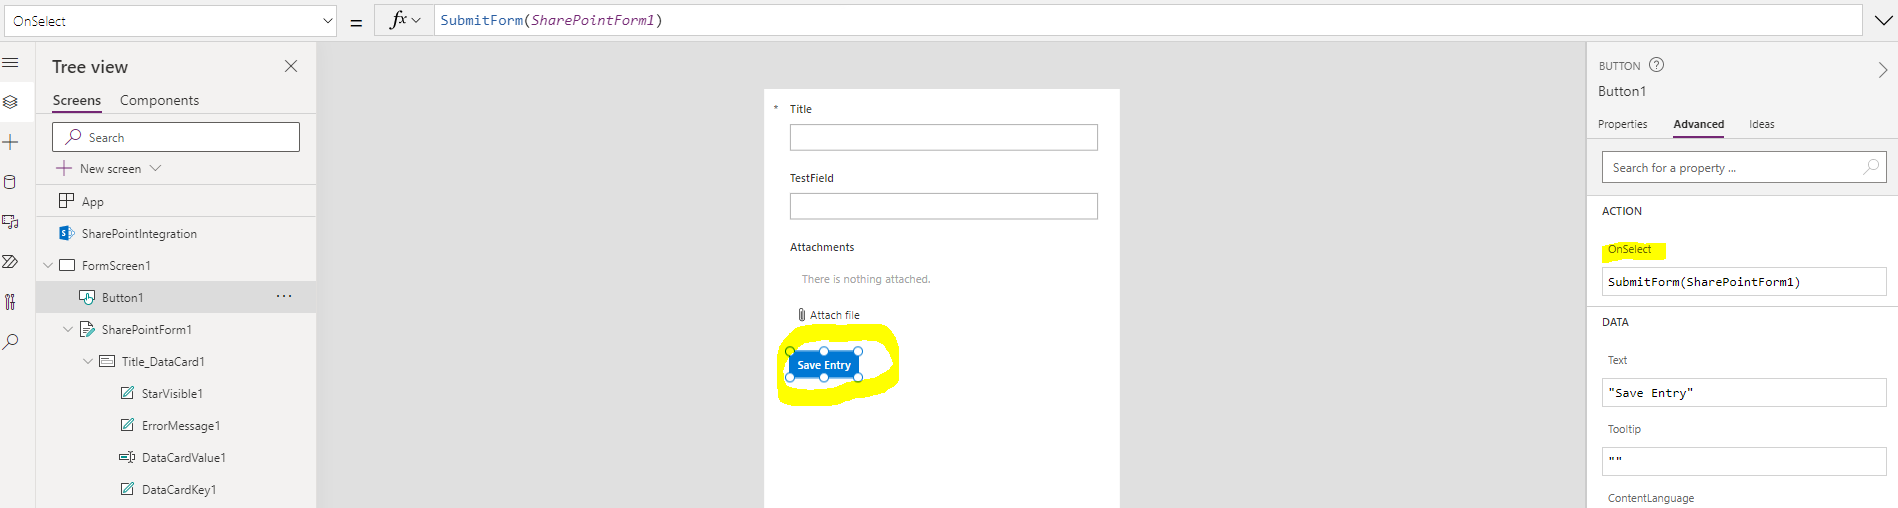
Add a SUBMIT button
With PowerApps, there is no button to save the changes! We’ll add a button in the form:
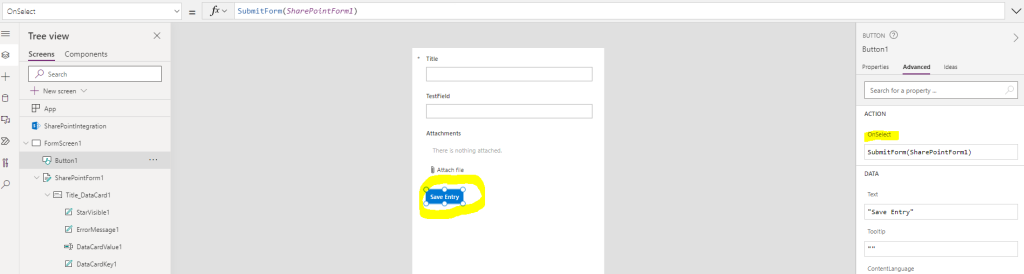
In the button’s properties, we change the onSelect to be:
SubmitForm(SharePointForm1)
Be aware that the page will stay with the form after clicking on the button. You could want to close using the Exit() function, but the user will be redirected on office.com … I’d recommend to use Launch() by redirecting your users to a page:
SubmitForm(SharePointForm1); Launch("https://tenant.sharepoint.com/sites/MySite/");
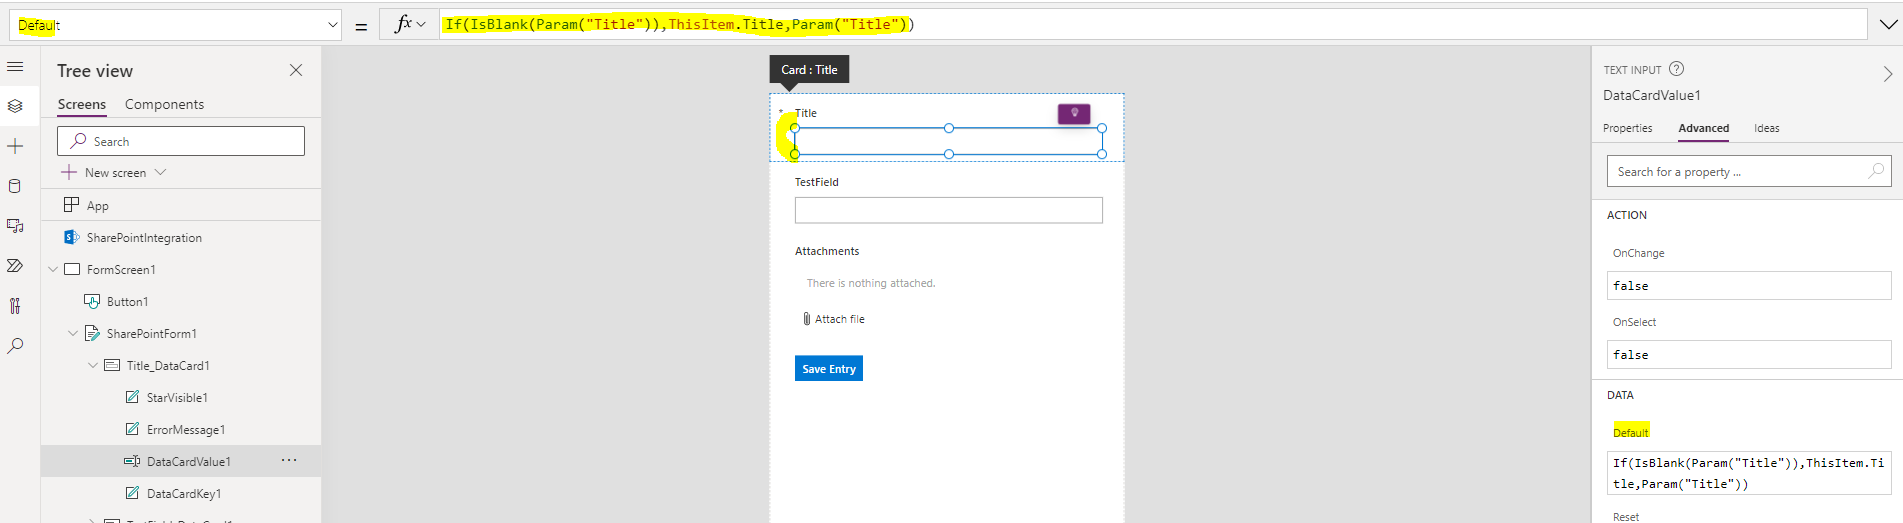
Set field’s value based on URL parameter
We can finally set the field’s value based on the parameter in the URL. Select the INPUT zone of the field, and in the Default section we use the below formula:
If(IsBlank(Param("Title")), ThisItem.Title, Param("Title"))
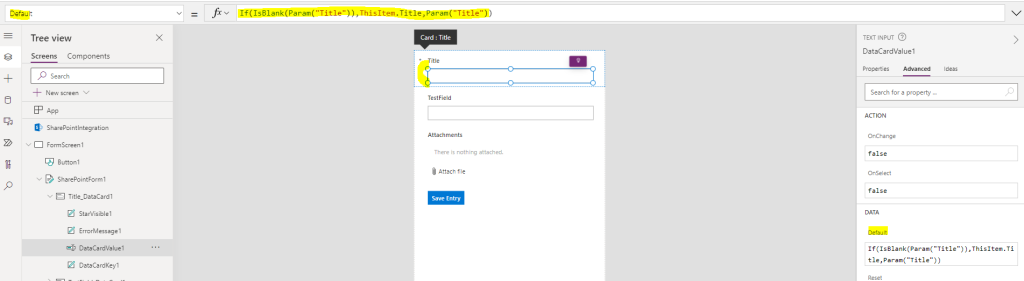
Here my field is called “Title” so I decided to use a parameter called “Title” as well.
Link to the form
We cannot use the NewForm.aspx or EditForm.aspx to access this form, but we need a special link.
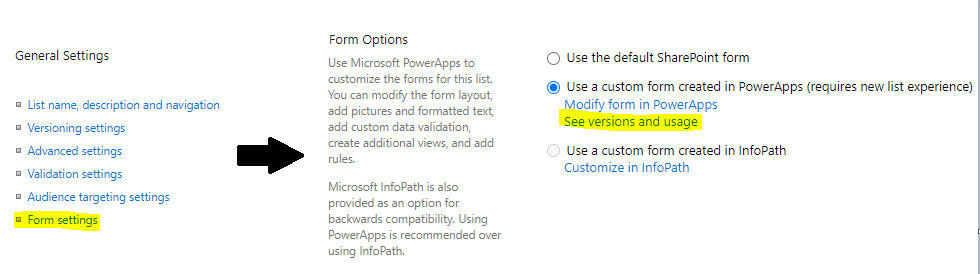
Go to your list settings:

Then go to the form settings (it’s from there that you can decide to keep PowerApps or use the original Sharepoint Forms), and click on See versions and usage:
You’ll get the App Id from this page:
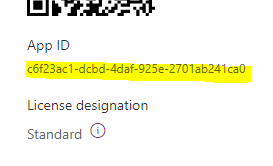
Next, you’ll use the App Id to forge the URL: https://apps.powerapps.com/play/providers/Microsoft.PowerApps/apps/APP_ID
With our example, the URL will be: https://apps.powerapps.com/play/providers/Microsoft.PowerApps/apps/c6f23ac1-dcbd-4daf-925e-2701ab241ca0
You can now pass the URL parameter: https://apps.powerapps.com/play/providers/Microsoft.PowerApps/apps/APP_ID?Title=Hello%20World
And an ID to retrieve an existing item: https://apps.powerapps.com/play/providers/Microsoft.PowerApps/apps/APP_ID?Title=Hello%20World&ID=2
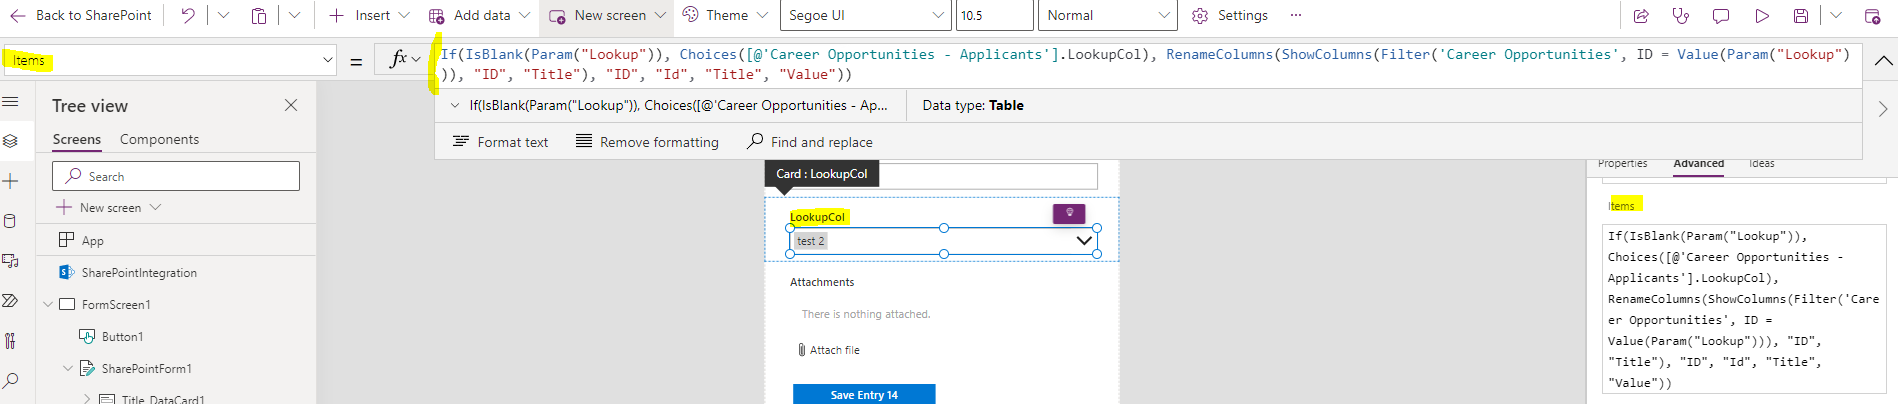
How to use it with a LookUp column?
If you want to auto-select a LookUp field using an URL parameter, you need to do a few things…
First, we need to add the related table. To do so, click on Data in the left navigation bar and search for SharePoint:
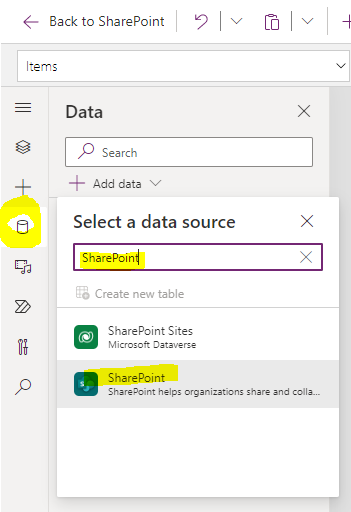
Search for the table and add it.
Second (optional) step: click on the Lookup field in the form and change the Items to show a list of options – if no “Lookup” ID in the URL, then we use the default list of options:
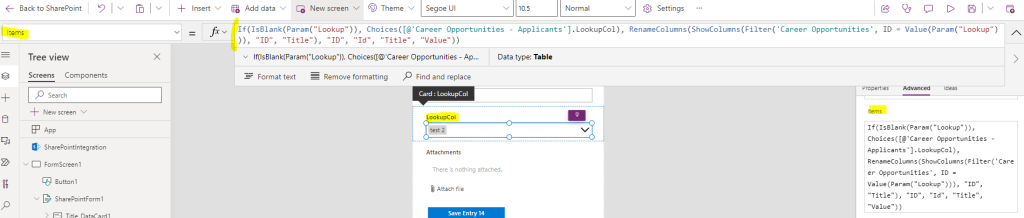
The below formula permits to retrieve the “ID” and “Title” from the distant list, base on the “Lookup” parameter, and to rename the result as {Id:"ID", Value:"Title"}:
If(IsBlank(Param("Lookup")), Choices([@'CURRENT LIST NAME'].COLUMN_NAME), RenameColumns(ShowColumns(Filter('DISTANT LIST NAME', ID = Value(Param("Lookup"))), "ID", "Title"), "ID", "Id", "Title", "Value"))
Third, click on the Lookup field in the form and change the DefaultSelectedItems to select the item from the list of options:

The below formula returns an empty selection with {Id:"", Value:""} when no URL param, otherwise it returns the first record for our lookup:
If(IsBlank(Param("Lookup")), {Id:"", Value:""}, First(RenameColumns(ShowColumns(Filter('DISTANT LIST NAME', ID = Value(Param("Lookup"))), "ID", "Title"), "ID", "Id", "Title", "Value")))
And finally, we can pass Lookup=ID in the URL to select the related item in the other list
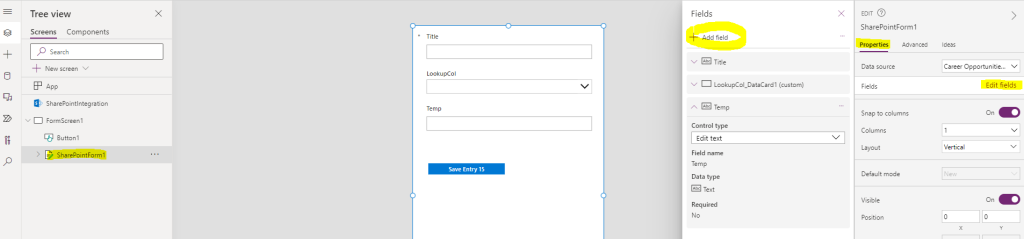
How to deal with new fields?
If you add a new field to your list’s settings, you’ll have to edit the form in PowerApps, and then edit the fields and add the new one:
(I used this article as a starting point)